Particle+Ubidots Do you know how your plants are feeling?

Build and deploy a soil moisture and temperature sensor using a Particle Device with Ubidots Platform. Nothing will replace walking out and handling soil for yourself, but today’s technology has made it possible to remotely monitor soil and track parameters that are unmeasurable to the human senses. Soil probes like the SHT10 have advanced technologically to be extremely accurate and offer an unparalleled look into what is happening underground. Giving instantaneous information on soil moisture content, saturation, salinity, temperature, and more, soil sensors have become important tools for anyone working with soil. From the small-town farmer trying to increase his yield to researchers looking to understand CO2 existence, soil sensors are a must have for any advancing agricultural operation.
Temperature and moisture sensors are amongst the most commonly used environmental sensors. And, more importantly, similar to the metrics of computer advancements increasing power but dropping prices, so too have soil measurement systems. These systems have and will continue to become more affordable for anyone.
What is Soil Moisture?
Soil moisture is difficult to define because it means different things in different disciplines. For example, a farmer’s concept of soil moisture is different from that of a water resource manager or a weather forecaster. Generally, however, soil moisture is the water present between soil particles – and for the purpose of this article, we will be using soil moisture as simply the amount of water present in a measurement of soil.
Why is Measuring Soil Moisture Important?
Compared to other components of the hydrologic cycle, the volume of soil moisture is small; nonetheless, it is fundamentally importance to any hydrological, biological, or biogeochemical process. Soil moisture information is valuable for a wide range of government agencies and private entities concerned with weather and climate, runoff potential and flood control, soil erosion and slope failure, reservoir management, geotechnical engineering, and water quality.
In this guide, you will learn how to build your own home-made soil moisture and temperature sensor. Also included are instructions for your newly collected data to be utilized via Ubidots, an application enablement platform designed to help tinkerers and businesses develop a deploy innovative solutions to environmental obstacles.
Materials required
- Particle Electron
- Soil Temperature/Moisture Sensor –SHT10
- 10K Resistor
- LED
- Wires
- Plastic Protection Case
- Micro USB cable
To program your device and display the data you must first be registered on the following pages:
- Particle account
- Ubidots account– for Educational Licenses
- Ubidots account– for Business/Industrial Licenses.
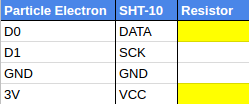
Wiring and Casing
The sensor we will build today is a SHT-10 with 4 data/power wires brought out. With this, any SHT-1X code for a microcontroller will work. The sensor works with 3 or 5V logic. The 1 meter long cable has four wires: Red = VCC (3-5VDC), Black or Green = Ground, Yellow = Clock, Blue = Data. Don’t forget to connect a 10K resistor from the blue Data line to the VCC in order to receive the sensor’s readings.
Follow the table and diagram below to make the correct connections:

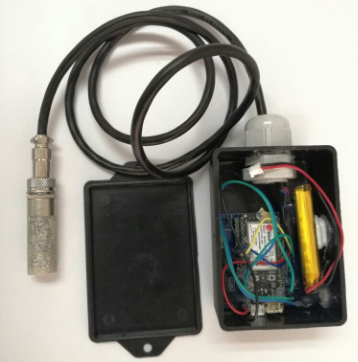
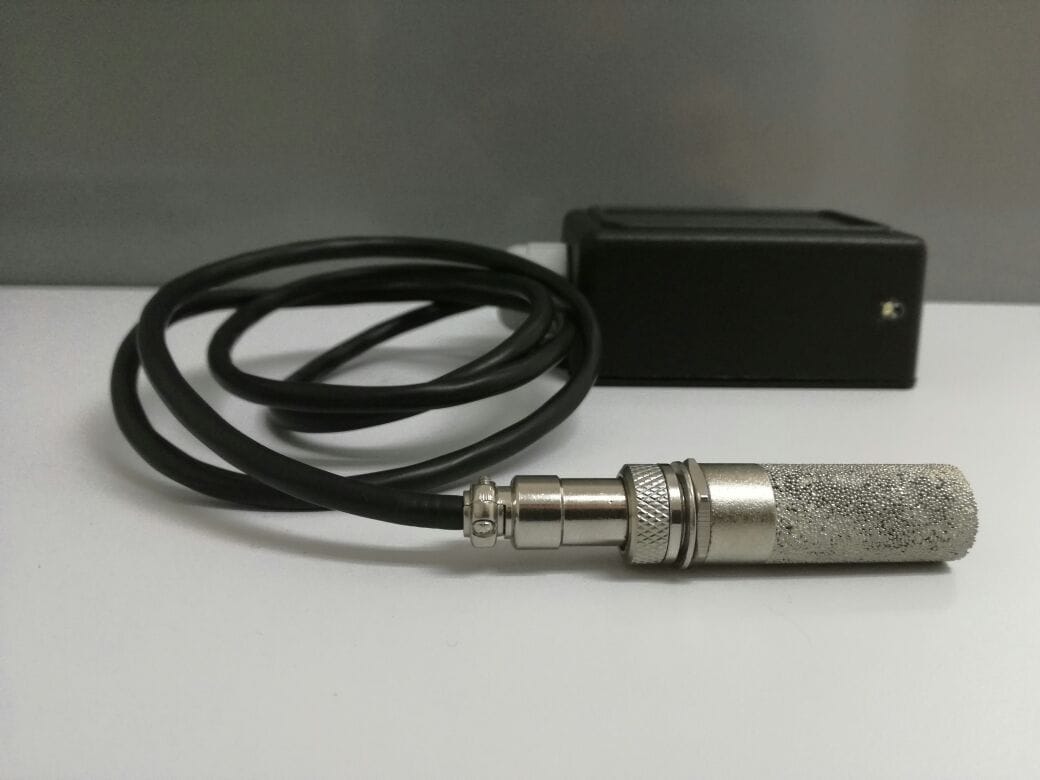
Once you have the right connections, assemble in your protection case. Please use your imagination for what this step. Below is how our full kit came together.
We now need to connect with Particle IDE
With your case and Particle Electron assembled in the protection case, we now need to connect your device to Particle’s IDE. Please reference the article below to connect your device if you are not already familiar with Particle’s IDE.
DO NOTE MISS THIS STEP: while working with your Particle IDE, you need to add 2 libraries – 1) UBIDOTS and 2)SHT1X (1.0.1 or newer).
Once you have included both libraries you will see something like this…

Now it is time to start coding 🙂
Copy the code below and paste it into the Particle IDE. Before you paste your code into the Particle IDE, be sure to erase the previous library inclusions (initial codes) and you are working with a blank IDE.
Once you have copied the code, you will need to assign the unique Ubidots TOKEN. If you don’t know how locate your Ubidots TOKEN, please reference this article: How to get your Ubidots TOKEN
CODE
Please, reference to this [link](https://gist.github.com/mariacarlinahernandez/824ab7af4fb22c0bfce6df382e272b26)to get the code if it is not visable in your browser.

// This example is to get the last value of variable from the Ubidots API

// This example is to save multiple variables to the Ubidots API with TCP method

/****************************************
 * Include Libraries
 ****************************************/

#include "Ubidots.h"
#include
#include

/****************************************
 * Define Constants
 ****************************************/

#ifndef TOKEN
#define TOKEN "Put_your_Ubidots"  // Put here your Ubidots TOKEN
#endif

#ifndef DATAPIN
#define DATAPIN D0
#endif

#ifndef CLCKPIN
#define CLCKPIN D1
#endif

#ifndef LED
#define LED D7
#endif

Ubidots ubidots(TOKEN);


/****************************************
 * Auxiliar Functions
 ****************************************/

SHT1x sht10(DATAPIN, CLCKPIN);

/****************************************
 * Main Functions
 ****************************************/

void setup() {
    Serial.begin(115200);
    pinMode(LED, OUTPUT);
    //ubidots.setDebug(true);  //Uncomment this line for printing debug messages
}

void loop() {

    float humidity = sht10.readHumidity();
    float temperature = sht10.readTemperatureC();

    ubidots.add("soil-moisture", humidity);
    ubidots.add("temperature", temperature);

    ubidots.setMethod(TYPE_TCP);  //Set to TCP the way to send data
    if(ubidots.sendAll()){
        // Do something if values were sent properly
        Serial.println("Values sent by the device");
        digitalWrite(LED, HIGH);
    }
    delay(5000);
    digitalWrite(LED, LOW);
}
Once you have pasted the code and updated the Ubidots TOKEN line, you must Verify this code within the Particle IDE. In the top left corner of our Particle IDE you will see the below icons. Click the Check Mark icon to verify any code.
Once the code is verified, you will receive a “Code verified! Great work” message in the Particle IDE.
Next, your have to upload the code into your Particle Electron. To do this, choose the flash icon up the check mark icon. (Be sure that your Electron is plugged into your computer’s USB port.)
Select the “FLASH OTA ANYWAY” to start the upload.
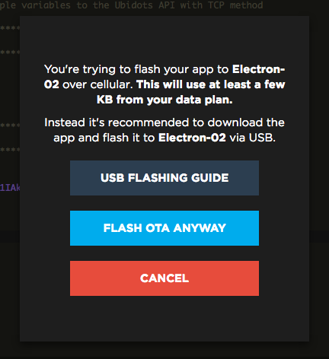
Once the code is uploaded, you will receive a “Flash successful! Your device is being updated – Ready” message in the Particle IDE.
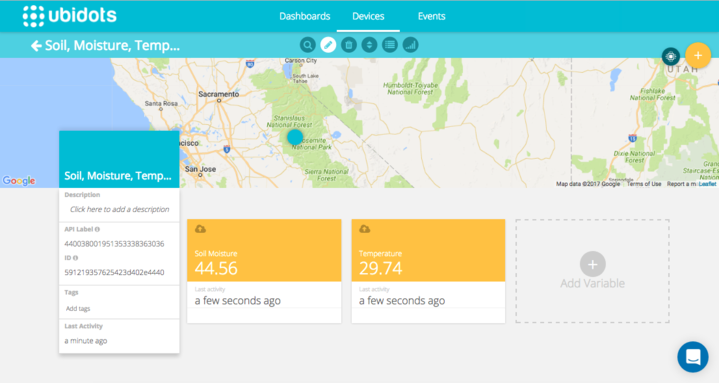
Now your sensor is sending the data to the Ubidots Cloud!
Status LED
The LED will turn ON every time the sensor send the data to Ubidots.
Management of the data in Ubidots
If your device is correctly connected you will see a new device created within the device section of your Ubidots application. The name of the device will be “particle“. If you open the devices tab you will see two variables corresponding to your Particle device: “soil-moisture” and “temperature” each taking readings every 10-12 seconds.
If you desire to change your device and variable names to more friendly ones, please reference this article below.
Result
Soil moisture is a key variable in controlling the exchange of water and heat energy between the land surfaces and our atmosphere. As a result, soil moisture plays an important role in the development of weather patterns, agriculture production, or gardening beauty. With this soil moisture and temperature tutorial you now are in control of your plants environments and can respond when your plants tell you they are thirsty or cold.
Now it is time to create a dashboard for controlling and managing your very own soil moisture and temperature sensor. To learn more about Ubidots widgets and events for optimizing your application, check out these video tutorials.