Send PLC Data to the Cloud with Node-RED & Modbus TCP
Learn how to send PLC data to the cloud using Node-RED, Modbus TCP, and MQTT. Optimize your smart factory with real-time monitoring and secure data transfer.

Imagine a world where your factory floor hums with seamless efficiency, every machine transmitting in real time, unlocking the power of predictive maintenance and production optimization. No more manual entry logs. No more blind spots in your production line. With Node-RED and MQTT, this isn’t just a futuristic vision—it’s your reality, ready for the taking.
As industry giants race to embrace the cloud-driven revolution, the power to transform your operations is right at your fingertips. Picture this: data flowing effortlessly from your PLCs to the cloud, analyzed and visualized for instant insights, all while you sip your morning coffee. It’s not just about connectivity; it’s about control, empowerment, and the ability to adapt in an ever-accelerating industrial landscape. Are you ready to elevate your operations and future-proof your business? Dive in, and let’s explore how to turn this vision into action in 5 simple steps.
Introduction
Why Send PLC Data to the Cloud?
Sending your PLC data to the cloud isn’t just a trend—it’s a game-changing strategy to maximize efficiency and resilience. At Ubidots, we see industrial IoT as a tool for smarter decision-making around four key topics:

- Production Optimization: Plant managers can track production in real time, leveraging metrics like Overall Equipment Effectiveness (OEE), quality, and availability. Understanding historical trends allows them to fine-tune production parameters, reducing reject rates and even demonstrating compliance and efficiency to customers.
- Smarter Maintenance: Whether it’s preventive or predictive, IoT empowers reliability managers to anticipate failures, slash unplanned downtime, and keep machinery running smoothly.
- Energy Monitoring: Or Energy Efficiency. Monitoring real-time energy consumption across key processes helps uncover cost-saving opportunities and optimize energy use. Knowing where and how energy is spent enables smarter cost management and boosts sustainability.
- Environmental Monitoring: Tracking environmental factors such as temperature, humidity, and air quality ensures that factories comply with regulations and operate safely. This also helps identify areas where conditions can be improved, reducing the environmental impact and enhancing worker well-being.
Once you've identified your value driver above, it is key to pick the right set of tools. To select your real-time monitoring and analysis toolkit, we believe in three guiding principles:
- Rapidness: Forget costly, time-consuming installations. Connecting an entire factory packed with thousands of sensors must be efficient and scalable. Hundreds of engineering hours aren’t an option—you need solutions that connect fast.
- Interoperability: Your data must be accessible and easily integrated with third-party systems. Imagine a machine triggering an automated maintenance order in your CMMS. Both at the edge and in the cloud, data should flow seamlessly.
- Flexible yet Reliable Tools: Proven tools are critical to ensure your data transfers securely and reliably. But flexibility is just as crucial. By choosing standard protocols and open interfaces, your IoT solution will be adaptable and manageable for both current and future needs.
With this in mind, Node-RED and MQTT stand out as a reliable and scalable solution for data transfer, empowering your smart manufacturing projects.
How to Send PLC Data to the Cloud?
Here are three commons ways to send PLC data to the cloud, each suited to different scenarios:
1. Directly PLC-to-Cloud
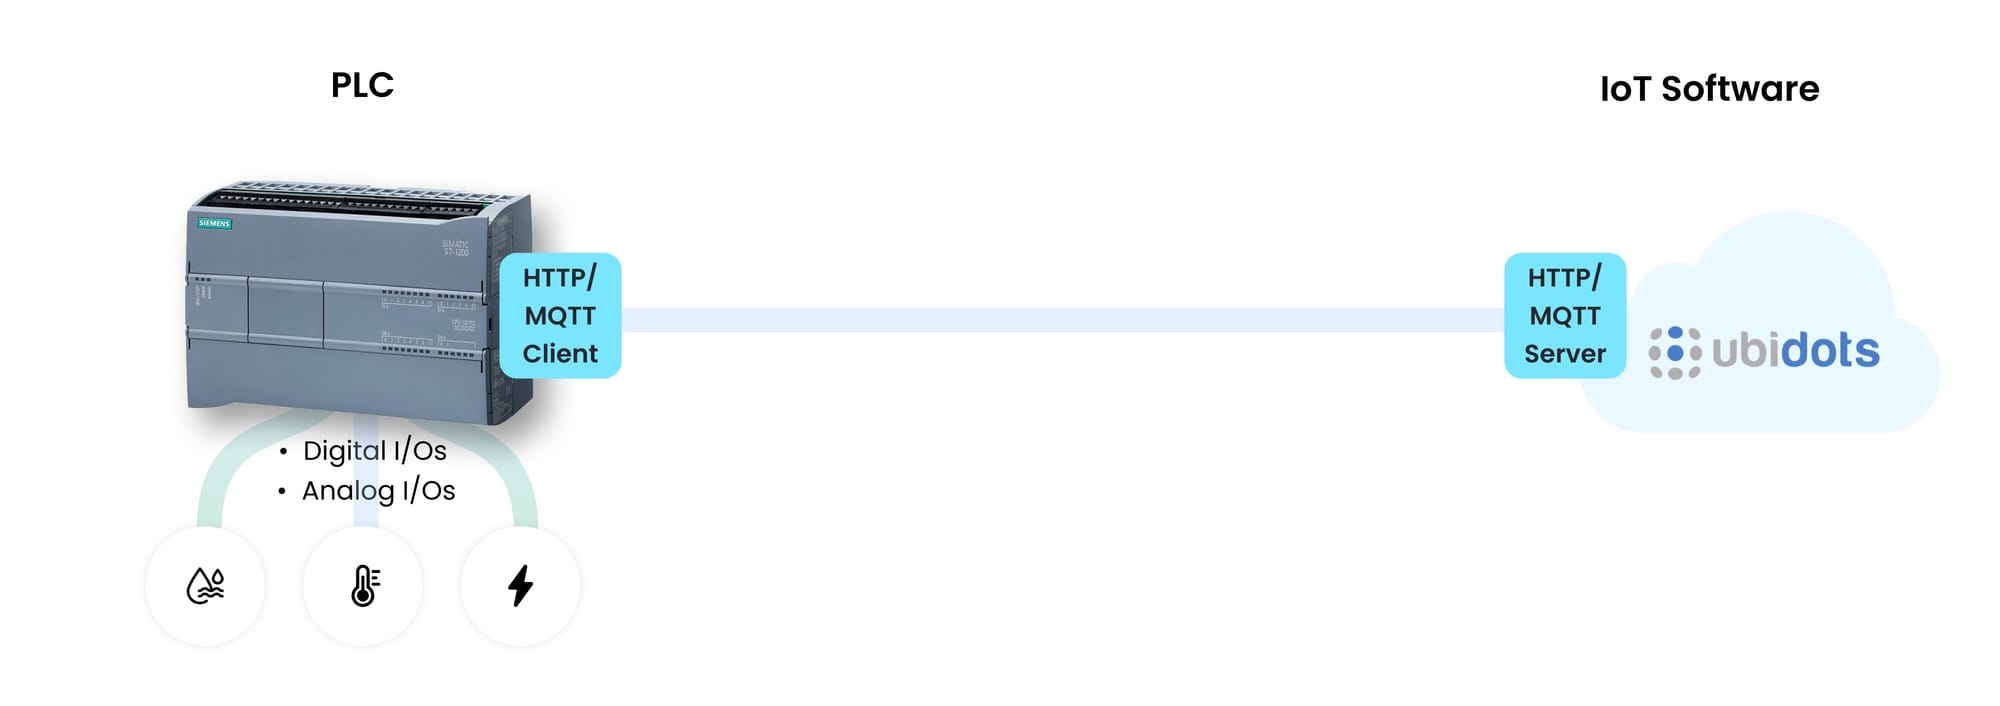
Some PLCs, like the Siemens S7 PLC, can connect to the cloud without needing an external gateway. For example, when paired with a CP 1543-1 or CP 1243-7 LTE module, the Siemens S7 can interact with cloud platforms using Internet-friendly protocols. This direct connection simplifies the setup and minimizes the hardware needed. However, it requires a PLC model and module that support cloud communication protocols—not to mention the extra costs; a Siemens CP unit is above the $1,000 price tag.
2. Through an IoT Gateway, from the PLC (This article)
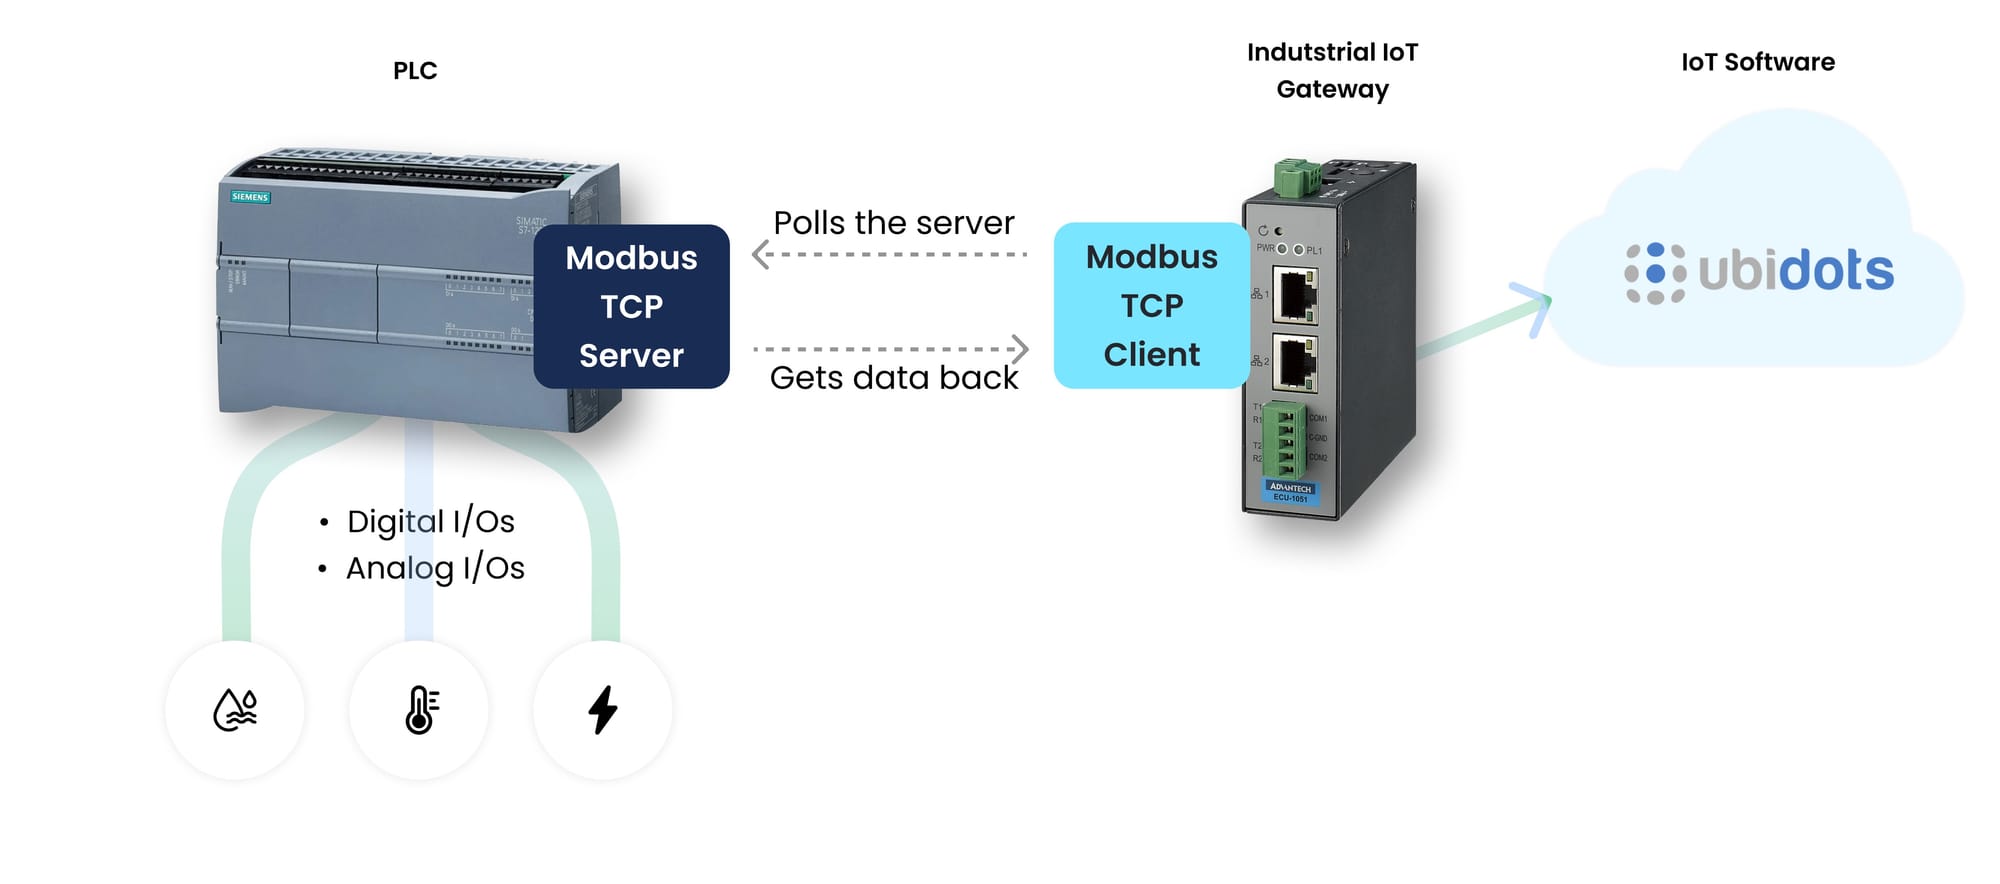
For a broader range of PLCs, an IoT gateway serves as the bridge to the cloud. By exposing PLC registers via the Modbus protocol, the gateway can read key data points—like sensor values and operational status—before sending them to the cloud using a protocol like MQTT.
One major advantage of this approach is scalability. In approach 1, you are limited to sending data from a single PLC. However, with an IoT gateway, you can poll data from multiple PLCs on the same network, using just one gateway. This setup provides a cost-effective, scalable solution across a variety of PLC models, even those without native cloud capabilities. Configuring a new endpoint for each PLC ensures proper data acquisition and communication.
3. Through an IoT Gateway, from the HMI
In cases where it’s impractical to modify the PLC’s ladder logic, connecting to the HMI interface can be an effective workaround. Many factories already use HMIs to display real-time PLC data. By connecting the IoT gateway to the HMI instead of directly to the PLC, you can still retrieve valuable data without changing the PLC’s programming. This approach ensures seamless cloud integration, even with legacy systems.
In this article, we’ll dive into the second approach: Sending data through an IoT gateway using Modbus, Node-RED, and MQTT. This method offers flexibility, scalability, and compatibility with a wide range of industrial equipment, enabling real-time monitoring with minimal disruption to existing setups.
Understanding the Basics of Node-RED and MQTT

What is Node-RED?
Node-RED is a powerful, open-source programming tool designed to connect IoT, APIs, and online services. But here’s the best part: it uses a visual, drag-and-drop interface that even non-coders can quickly grasp. Instead of writing complex lines of code, you connect nodes in a flow-based model. This makes creating automation solutions faster, more intuitive, and incredibly scalable.
Where can you run Node-RED? Anywhere with enough processing power. For industrial IoT applications, gateways with robust CPUs are ideal. These devices sit at the network’s edge, gathering data from machines and processing it efficiently before sending it to the cloud. This is crucial in edge computing environments, ensuring real-time responsiveness, minimal latency, and high network reliability.
MQTT: Lightweight, Efficient Protocol for IoT
If Node-RED is the brain, the MQTT protocol is the nervous system, transmitting data quickly and reliably. MQTT (Message Queuing Telemetry Transport) is a lightweight messaging protocol specifically designed for the high-performance needs of IoT. It’s lean, efficient, and excels at sending small packets of data, making it perfect for scenarios where bandwidth or power consumption is limited.
Benefits over traditional protocols like TCP or HTTP:
- Minimal Overhead: Unlike the heavy and complex HTTP protocol, MQTT uses fewer resources, which means faster data transfer and reduced power consumption.
- Reliability: It ensures message delivery even in unreliable networks, making it a preferred choice for mission-critical applications.
- Security: MQTT supports robust security features, including TLS encryption and client authentication, to protect data as it travels from the edge to the cloud.
When combined, Node-RED and MQTT become a powerhouse for efficient, scalable data transfer. This combination has quickly become the standard for IoT deployments, enabling real-time communication and data-driven decisions.
Next, let’s explore how to set up your system to extract Modbus TCP data from a PLC and send it to the Ubidots cloud.
Requirements
Before diving into the step-by-step setup, let’s ensure you have everything you need to send PLC data to the cloud seamlessly. Here’s what you’ll need:
- A PLC Configured to Expose Data as a Modbus Server: For this guide, we’ll be working with a Siemens S7 PLC, configured as a Modbus TCP Server.
- A PC or IoT Gateway: You’ll need a device with at least 512MB of RAM and a 1GHz processor. This could be a standard PC or an industrial IoT gateway. The gateway must support Modbus TCP configuration and be able to run Node-RED flows.
- A Cloud MQTT Service: To send and visualize your data, you’ll need a reliable industrial IoT platform. We’ll be using Ubidots, which provides a simple yet powerful interface for handling IoT data. Ubidots’ MQTT capabilities make it easy to establish efficient communication between your devices and the cloud.
With these components in place, you’ll be set up to extract data from your PLC and transfer it to the cloud for real-time monitoring and analysis.
Step 1: Installing Node-RED
Let’s get Node-RED installed and ready for action. The installation process varies depending on your operating system, so follow these instructions based on your setup:
- Linux Debian-Based Operating Systems (Including Ubuntu): The simplest way to install Node-RED is to use the official installation script found here.
- Windows Users: Setting up Node-RED on Windows is straightforward but requires a few extra steps. Follow the official guide for Node-RED installation here.
Once you’ve successfully installed Node-RED, open your preferred web browser and enter:
- Local Access:
http://localhost:1880 - Remote Access:
http://<device-IP-address>:1880
If Node-RED is running properly, you’ll be greeted with its intuitive interface. Time to get started!
Step 2: Using "node-red-contrib-modbus" Package to Gather PLC Data
2.1 Package Installation
Open the Manage Palette menu in Node-RED, search for “modbus,” and install the node-red-contrib-modbus package. This will give you access to nodes designed for Modbus TCP communication, allowing seamless interaction with your PLC.
Under the “Install” tab, search for “modbus” and install the “node-red-contrib-modbus” package:

After successfully installing it, you should be able to see the modbus nodes in the left pane of Node-RED’s main interface:

2.2 Setting Up the Modbus TCP Client
Drag and drop a modbus read node into the workspace and double click on it to display its settings. Then, click the pencil icon to edit the modbus client configuration:

Enter these parameters:
- Name: This is just an for the node in node-red, so choose a name that helps you identifying this node better.
- Host: This is the IP address of your PLC. Check our past article about setting up the Siemens S7 1200 as Modbus TCP server. In Siemens based TIA Portal, ensure that in the DBs attributes, “optimized block access” must be disabled. The tags must be writeable and accessible “No protection” must be set in the CPU properties.
- Type: This is the protocol’s variant, which can be serial for modbus RTU or TCP for modbus over TCP. Following our example, we’ll set it to TCP.
Leave all the other settings on their default values or change them according to your requirements, then click the Add button to save.
2.3 Setting Up The Modbus Read Node
After saving, Node-RED will automatically take you back to the Modbus read node configuration. Set its parameters as follows:
- Name: This is an identifier for this node. Select a name that helps you identify this node easily.
- FC: This is the modbus function used to interact with the PLC’s registers. Since we are going to read values from its holding register, select “FC 3: Read Holding Registers”.
- Address: This is the address to start reading the registers from the plc. Set it according to your requirements.
- Quantity: This is the number of registers to read, starting from Address. Set this accordingly to your needs.
- Poll Rate: This is the frequency with which data will be polled from the PLC registers. Set this according to your requirements.

2.4 Testing Modbus Connection: Ensuring Data Flow from PLC to Node-RED
Node-red has a debug panel to view the data we just received. Lets drag the debug node at the top and connect it with Modbus Read node:

After adding the debug node, deploy the flow and look at the debug window on your right; the PLC data should begin to appear, formatted as JSON:

Congratulations! You have successfully used Node-Red to read Modbus Data from PLC. Our next step should be sending the data to Ubidots MQTT server and building a SCADA dashboard.
Step 3: Setting Up MQTT Broker for Cloud Communication
For this guide, we’ll be using Ubidots MQTT broker, so there's no need to setup your own cloud MQTT broker. Ubidots simplicity, built-in security features, and comprehensive visualization tools make it an excellent choice for effortlessly bringing your industrial IoT data to the cloud. However, if you're looking for extra options here a quick comparison table:
| MQTT Broker | Description | Pros | Cons |
|---|---|---|---|
| EMQX | A powerful, open-source MQTT broker that’s highly scalable. | High performance, customizable, and can handle massive amounts of connections. | Requires running and maintaining your own cloud servers, which means potential unexpected outages, DevOps costs for scalability, and cloud instance expenses. |
| Mosquitto | Another reliable, open-source broker that's lightweight and widely adopted. | Simple to set up, minimal resource usage, and well-documented. | Demands server maintenance and incurs cloud infrastructure costs. Scalability and reliability require careful configuration and ongoing monitoring. |
| Ubidots | A cloud-based solution that does more than just MQTT ingestion. | Works out of the box, offers a free trial, and eliminates the hassle of maintaining servers. Provides a full suite of data visualization and analysis tools for smart manufacturing projects. | Fewer customization options compared to self-hosted brokers like EMQX or Mosquitto, but ideal for simplicity and ease of use. |
Regardless of your choice, we recommend always using TLS encryption for secure communication, and set QoS (Quality of Services) at "2" to critical data delivery.
Step 4: Sending PLC Data to the Cloud (Ubidots)
Before starting, make sure you’ve created an Ubidots account, and then a device. Copy the device token as we’ll use it to authenticate our MQTT connection:

Now let's prepare the payload. Ubidots’ MQTT server requires data in a specific JSON format. To structure our PLC data accordingly, we’ll use a function node.
1. Drag a Function Node: Drop the function node into your Node-RED workspace. Connect this node to your existing Modbus data nodes as needed.

2. Edit the Function Node: Double-click the function node and paste the following code into the editor. This code will add a random number to the PLC's fixed register values, introducing some variability to our charts:
const randomInt = Math.floor(Math.random() * 10) + 1;

msg.payload = {
  "level1": {
    "value": msg.payload.data[0] + randomInt,
  },
  "pressure": {
    "value": msg.payload.data[1] + randomInt,
  },
  "level2": {
    "value": msg.payload.data[2] + randomInt,
  }
};
return msg;

3. Click Done to save your configuration.
Now, it’s time to send this data to Ubidots using MQTT.
4. Add an MQTT Out Node: Search for the mqtt out node and drop it into the workspace. Connect it to the function node you just configured.

5. Configure the MQTT Out Node: Double-click on the mqtt out node. Click the pencil icon to create a new MQTT server configuration.

6. In the Connection Tab:
- Set the Server to `mqtt://industrial.api.ubidots.com`.
Leave the other settings as default or adjust based on your requirements.

7. Set Security Credentials:
- Switch to the Security Tab.
- In the Username field, paste the device token you obtained earlier from Ubidots.
- Click Add/Update to save these settings.

Once you’re back on the main configuration screen:
8. Set the Topic: In the Topic field, paste: `/v1.6/devices/<your-device-label>`. Replace `<your-device-label>` with your actual device label from Ubidots.

9. Click Done and deploy your flow.
With everything deployed, you should see data flowing to Ubidots. Head over to your Ubidots account, and your device should now be visible with real-time data updates. Time to watch your charts come to life!

Step 5: Creating Real-Time PLC Dashboards in Ubidots
Now that our data is stored under an Ubidots device, it’s time to transform this raw information into a dynamic SCADA visualization. Let's create a simple dashboard for monitoring our industrial process, where Tank-1 and Tank-2 are linked by a pump moving fluid at a specified pressure.
Creating Cloud-Based SCADA Dashboards
Head over to the dashboard view in your Ubidots account. Click the “+” icon in the top right corner to add a new SCADA widget:

You can also integrate other nodes like button nodes and function nodes for JSON conversion to enhance the functionality of your dashboard.
Note: this feature is available only with an industrial license.
Select the SCADA widget and attach all the variables you defined in the previous step. Once done, click Save.

Now, it’s time to design your dashboard. If you’re new to the SCADA editor, take a moment to familiarize yourself using the introductory guide provided here). Start dragging and placing key elements such as tanks, pumps, level gauges, and piping, as shown in the image below.

Label everything clearly: Tank-1, Tank-2, pump pressure, and fluid levels. Connect each widget to the appropriate data tag and configure the visual properties of your level indicators, piping, and pump. Make sure your layout is both functional and intuitive.
Once your SCADA dashboard design is complete, hit the Save icon. Return to the main dashboard view. Voila! Your real-time SCADA dashboard is now live, displaying data flowing from your PLC via Modbus and MQTT, orchestrated by Node-RED. Ubidots’ SCADA widget comes with a rich library of standard icons commonly used in industrial settings. Plus, you can create custom icons to tailor your visualization to your needs, allowing for complex and precise SCADA views.

Customizing Dashboards: Using Further Visuals to Monitor PLC Data Trends
Ubidots offers a variety of widgets to enrich your dashboards beyond SCADA. Utilize line charts to track historical trends, radial gauges for intuitive metric readings, and heatmaps for visualizing large data sets. Each widget can be customized to display exactly the information you need, helping you gain actionable insights into your operations at a glance. Experiment with colors, labels, and layouts to make your dashboard both visually appealing and highly functional.

Alerting and Notifications: Set Up Alerts for Critical Metrics
Data visualization is essential, but proactive alerting is where the magic happens. With Ubidots’ Events Engine, you can set up alerts for critical thresholds. Need to be notified if the fluid level in Tank-1 drops too low or if pump pressure spikes? Configure alerts via SMS, email, voice call, WhatsApp, Telegram, or even webhooks to integrate with external systems. These alerts ensure you’re always in the loop, helping you prevent costly downtime and maintain optimal performance.

Best Practices for PLC Data Security and Compliance
Securing Data in Transit with TLS for MQTT
When testing your setup, it’s okay to skip encryption for the sake of simplicity. But in a production environment, using TLS encryption is non-negotiable. TLS encrypts data as it travels from your PLC to the cloud, making it unreadable to any prying eyes lurking on your network. Protecting data in transit isn’t just about good practice—it’s about meeting stringent security standards.
But encryption doesn’t stop there. IT departments will expect you to ensure that data is also secure in the cloud. This means having encryption at rest, where data stored on servers remains encrypted. Whether you’re using a self-hosted MQTT broker or a cloud provider like Ubidots, ensure this information is readily available. It’s a crucial part of gaining internal sponsorship and demonstrating that your data pipeline is secure from end to end.
Managing Permissions and Access Control for PLC and Cloud Data
Granular access control is another pillar of IoT security. Ubidots simplifies this with role-based authentication, allowing you to segment your IoT projects into separate organizations. Each organization can have its own dashboards, devices, end-users, and alerts. This is particularly useful if you manage multiple facilities or clients, as it ensures that only authorized users have access to specific data.
You can also set custom permission roles. Need to restrict who can edit dashboards or manage devices? No problem. Ubidots has you covered, along with features IT teams love, like session expiration and strict password policies. These options make it easy to balance accessibility and security, satisfying even the most meticulous IT audits.
Compliance Considerations for Industrial IoT Data Transfer
One common concern from IT departments is the idea of data leaving the secure confines of your factory and heading into the cloud. Ensure that you activate the permit access with PUT/GET communication from remote partner option during the configuration to enable seamless communication between different components. A simple yet secure approach to mitigate these concerns is implementing a one-way data flow: “data goes out, never comes in.” This means there are no external ports exposed, and no commands can be sent from the cloud to your PLC.
In this guide, for example, we’ve only used Modbus read nodes. We’re strictly reading data, not writing any back to the PLC registers. This setup minimizes vulnerabilities and ensures that your IoT deployment focuses on data monitoring rather than remote control, providing peace of mind to your IT and security teams.
Advanced Use Cases: Extending Your Node-RED & MQTT Setup
Integrating Wireless Sensors to Your Node-RED IoT Gateway
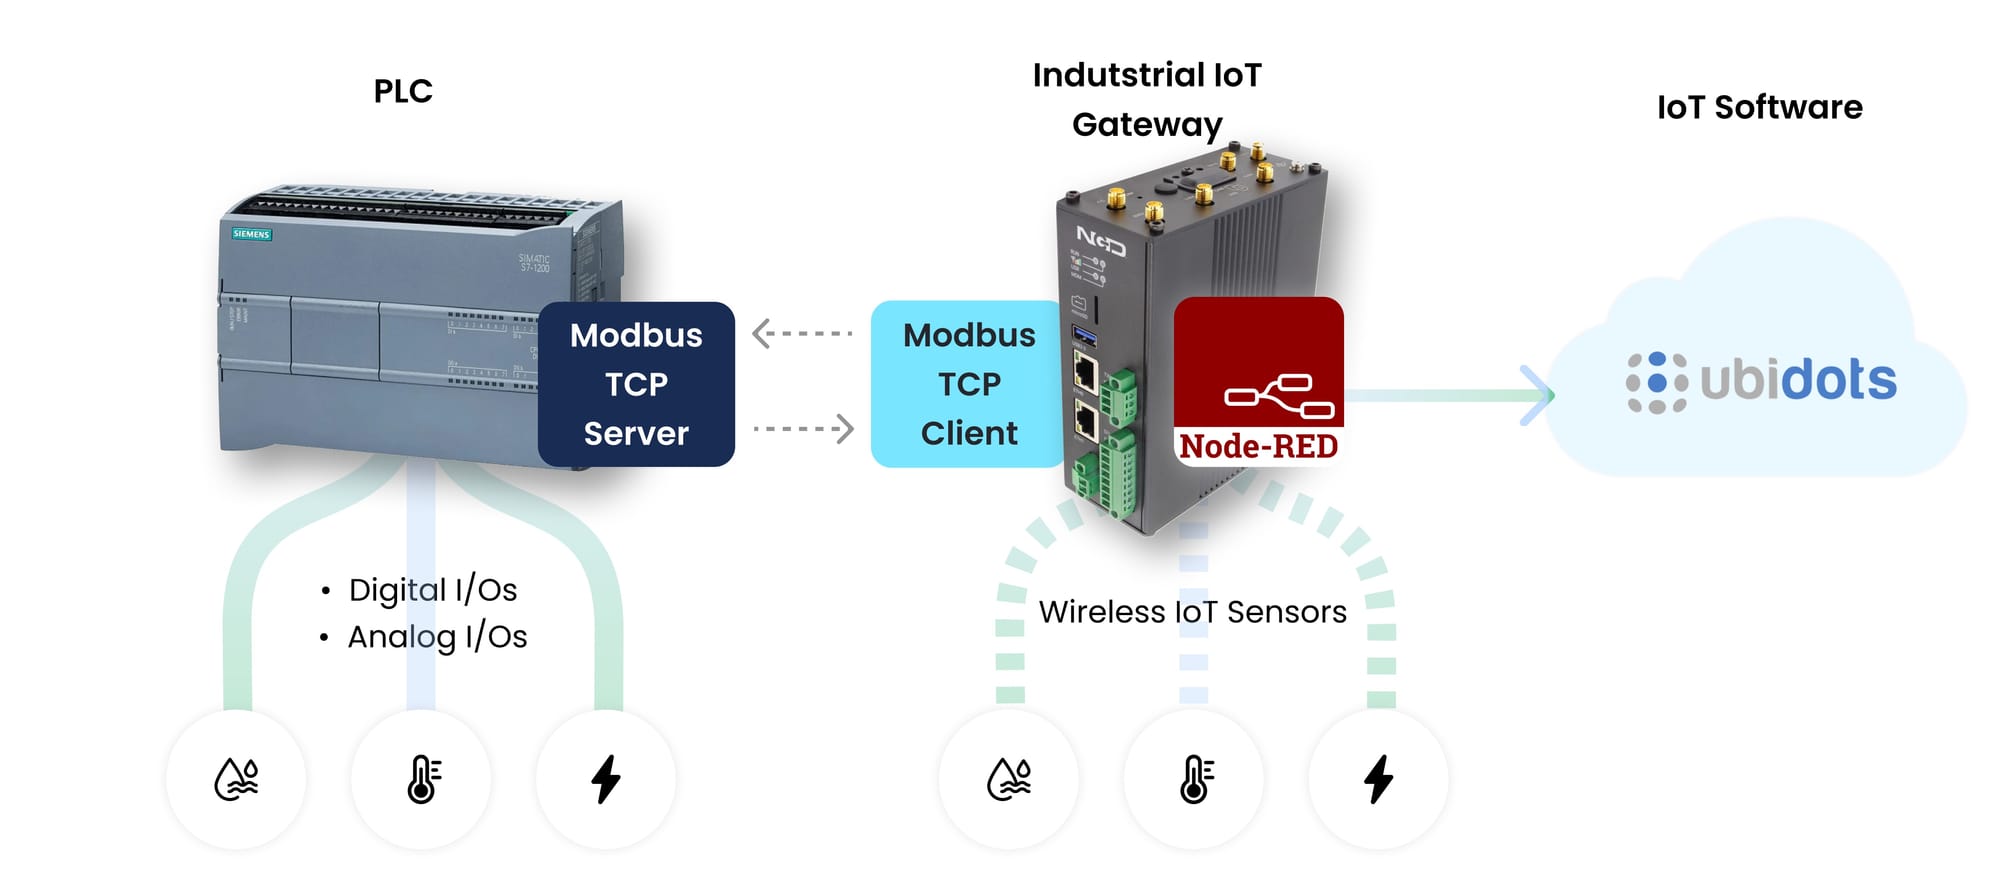
Why limit your data to just what your PLCs provide? Many IoT gateways come equipped with wireless communication capabilities like WiFi, BLE (Bluetooth Low Energy), LoRa, or proprietary radios. This opens up a whole new world of possibilities for monitoring. Take the NCD Enterprise IoT Gateway, for instance. It’s compatible with a wide array of wireless sensors, ranging from temperature and humidity monitors to current sensors, uptime counters, and even part counters.

By integrating these wireless sensors, you can measure variables that go beyond your PLC data, giving you a richer, more holistic view of your operations.
Managing Your IoT Gateway Remotely Using VPNs or ZeroTier
IoT gateways are often deployed at remote or hard-to-reach locations. This makes remote management crucial, especially if you need to tweak configurations as your project scales from prototype to full deployment. Installing a ZeroTier VPN on your Linux-based IoT gateway is a game-changer. It allows you to access and manage your gateway as if it were on your local network, without the hassle of setting up complex VPNs or getting IT involved. This makes remote monitoring and configuration smooth and scalable.
Adding Cellular Connectivity for Backhaul
Most Node-RED-powered IoT gateways support cellular connectivity, which can be a game-changer for industrial deployments. It’s not just about sending data to the cloud. Cellular connections also enable you to manage your gateways remotely, ensuring continuous access even if the local network goes down. Using cellular as a backup—or even the primary connection—adds a layer of redundancy and ensures your IoT project stays operational, no matter what network interruptions occur on site.
Conclusion: Unlocking the Power of Real-Time Data in Industrial IoT
Harnessing the power of real-time data from your PLCs isn’t just a dream—it’s a tangible, actionable reality. By leveraging the Node-RED & MQTT data pipeline, you’ve built a robust system where data flows seamlessly from your factory floor to the cloud. Node-RED’s visual programming makes configuration intuitive, while MQTT ensures efficient, secure data transfer. Together, they form a scalable solution, empowering your operations with real-time monitoring and proactive insights.
Maximizing ROI is about more than just implementing new technologies. It’s about transforming data into decisions. Cloud-connected PLCs offer an unprecedented level of visibility and control, reducing downtime, optimizing energy usage, and enabling predictive maintenance. The result? Increased efficiency, cost savings, and a more agile, future-proof industrial setup.
Ready to take things further? Check out our additional resources on advanced Node-RED flows, MQTT security practices, and the latest innovations in industrial IoT. Dive deeper, and continue to unlock the full potential of your data-driven factory.
Frequently-Asked Questions (FAQs)
How to send PLC data to cloud?
You can send PLC data to the cloud using several methods. One common approach is to use an IoT gateway that reads data from the PLC using a protocol like Modbus and then sends it to the cloud using MQTT. Alternatively, some PLCs support direct cloud communication through built-in modules that use HTTP or MQTT. The method you choose depends on the capabilities of your PLC and your project requirements.
Is Node-RED used in industry?
Yes, Node-RED is widely used in industrial applications. Its ease of use and flexibility make it a popular choice for developing IoT solutions, integrating disparate systems, and creating custom workflows for data processing and automation. Many industries use Node-RED for tasks like monitoring equipment, data analysis, and even predictive maintenance.
How to use Modbus TCP in Node-RED?
To use Modbus TCP in Node-RED, you need to install the `node-red-contrib-modbus` package. Once installed, you can use nodes like Modbus Read or Modbus Flex Getter to poll data from your PLC over the Modbus TCP protocol. Configure the nodes with the correct IP address and Modbus parameters to establish communication and extract data from the PLC.
How to connect Siemens PLC to Node-RED?
To connect a Siemens PLC to Node-RED, you can use the Modbus TCP protocol if your PLC supports it. First, configure your Siemens PLC to act as a Modbus server. Then, in Node-RED, use the Modbus nodes from `node-red-contrib-modbus` to read or write data. Make sure to configure the nodes with the correct Modbus settings and PLC IP address to establish a reliable connection.
What is Modbus Flex Getter?
Modbus Flex Getter is a flexible Node-RED node used to read Modbus registers from a PLC or other Modbus-compatible devices. Unlike the standard Modbus Read node, the Flex Getter allows more dynamic configuration of the Modbus parameters, such as the address and quantity of registers to read. This is particularly useful when you need to create more adaptable data flows.
What protocols are supported by Node-RED?
Node-RED supports a wide range of communication protocols, making it a versatile tool for industrial and IoT applications. Some of the most common protocols include:
- MQTT: For lightweight, reliable messaging.
- HTTP/HTTPS: For web-based communication and RESTful APIs.
- Modbus (TCP/RTU): For communication with industrial devices like PLCs.
- OPC UA: For connecting to industrial automation systems.
- WebSockets: For real-time, bidirectional communication.
- Serial: For communicating with legacy serial devices.
Node-RED’s extensive library of nodes also allows for support of many other protocols, making it adaptable to a wide range of use cases.


