Set up Raspberry Pi's Wi-Fi via Bluetooth to then send data to Ubidots
At least one time in your life you struggled setting up the Wi-Fi credentials of a Raspberry Pi just because you didn't have a monitor with you at the moment.
In this guide, I will describe how to configure a Raspberry Pi with an AP (Access Point) which can via a portable android app. Cannot plug an Ethernet cable just because you are in a new location? Don't worry - After following this guide, you will be able to use your Pi in any location, all just need is scanning the network, choose the desired network to establish the connection with, write the credentials, and you are connected!
I deployed a simple tool that allows to set the SSID and PSK of Raspberry pi Wi-Fi over Bluetooth communication. For the moment, it’s super basic – you just need to have previously paired your Android phone with your Raspberry Pi and I've written a basic Android app.
Personally, I think this is really useful for those who are around with their Raspberry Pi, moving it from one workshop to another one, taking it from house to school, plus all the possible cases you have in mind right now... Now, without discussing more, let's start building cool things, starting with the installation of the python script which is going to be running in our Raspberry Pi.
Requirements
- Raspberry pi (Any Raspberry pi with Wi-Fi)
- Raspbian OS loaded Micro SD Card
- Android phone with 4.2 OS Jelly bean
- APK file and python run script
Step-by-Step
- Setting up Raspberry Pi’s Bluetooth
- Pairing Raspberry Pi and Android Phone
- Setting DHT22 sensor – Hardware
- Setting DHT22 sensor – Software
- Sending/Visualizing data to Ubidots
1. Setting up Raspberry Pi’s Bluetooth
In the beginning, you'll need a monitor + keyboard connected, alternative access the Raspberry Pi over SSH just to be able to establish all the configurations required through the Raspbian Terminal.
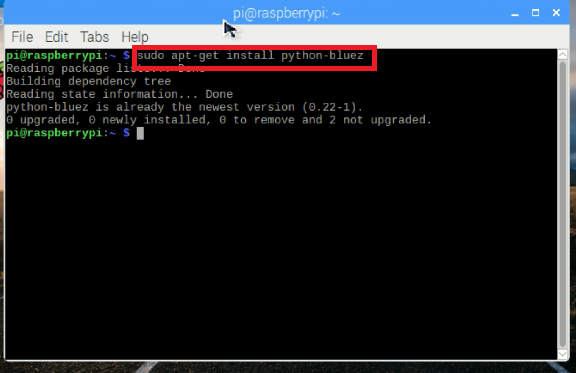
Run the commands below carefully to establish the proper configurations:
- Install bluez (Python bluetooth library):
$ sudo apt-get install python-bluez
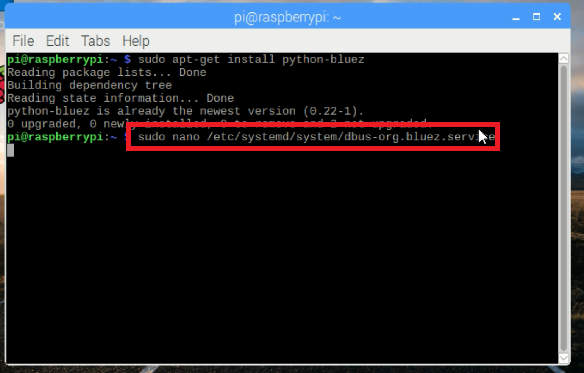
2. Start the Bluetooth daemon in compatibility mode. To do this, edit /etc/systemd/system/dbus-org.bluez.service, by running the command below:
$ sudo nano /etc/systemd/system/dbus-org.bluez.service
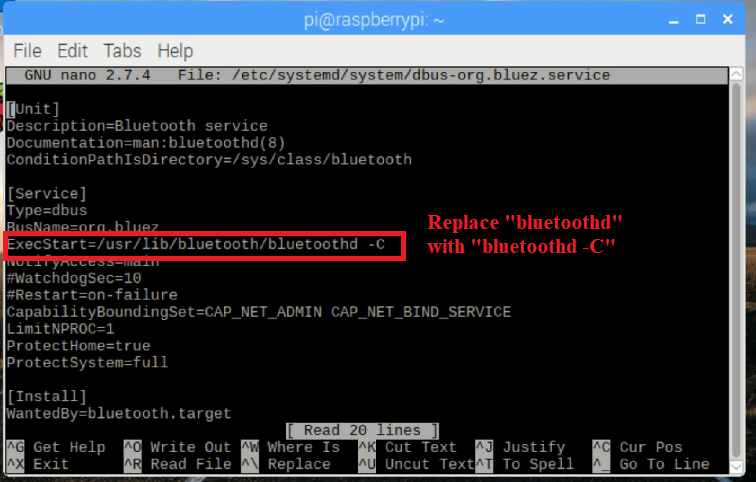
3. Then, modify the ExecStart param:
ExecStart=/usr/lib/bluetooth/bluetoothd –C
4. Now, load the serial port profile by using the command below:
$ sudo sdptool add SP
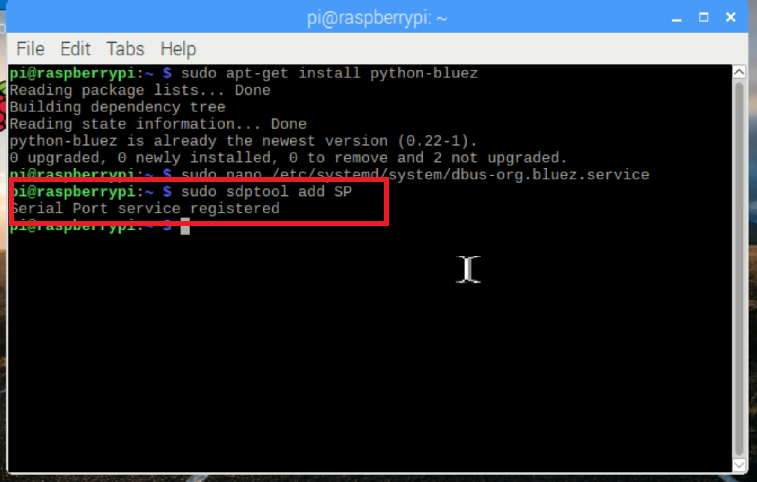
5. To save the changes properly, restart your Pi:
$ sudo reboot
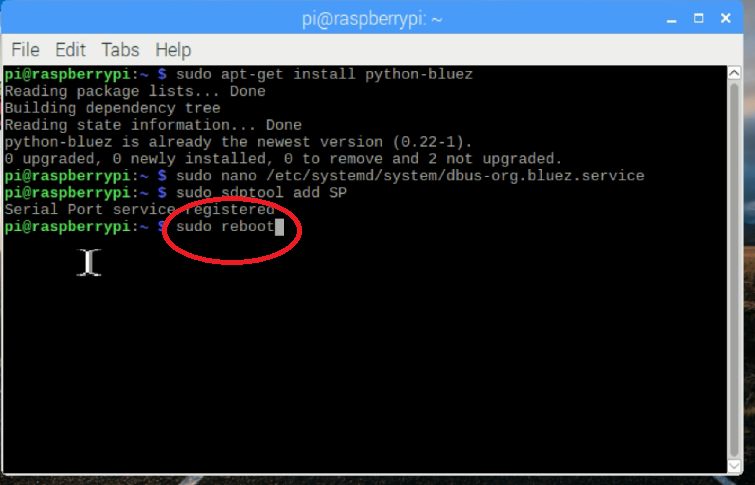
After the Rebooting let’s pair the Bluetooth with our android phone
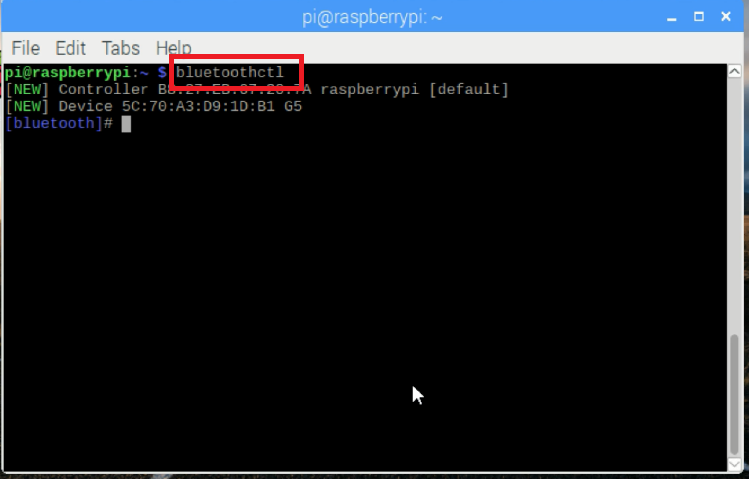
2. Pairing Raspberry Pi and Android Phone.
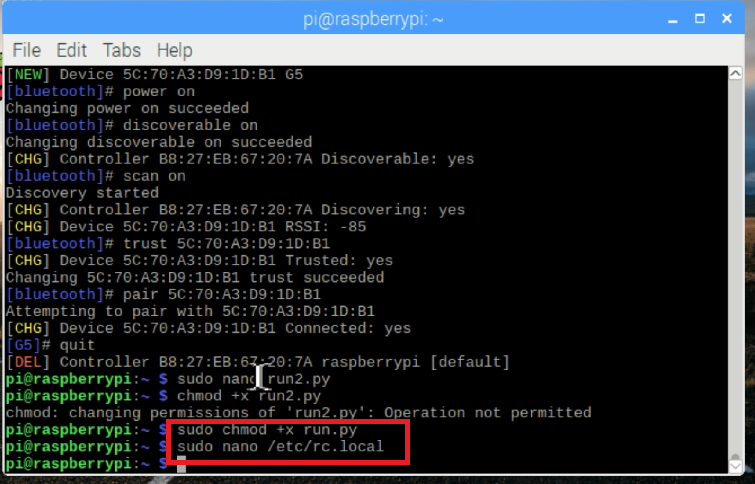
1. Pair your Android phone with your Raspberry Pi. To do this, turn your phone's bluetooth on, and run the command below in your Pi:
$ bluetoothctl
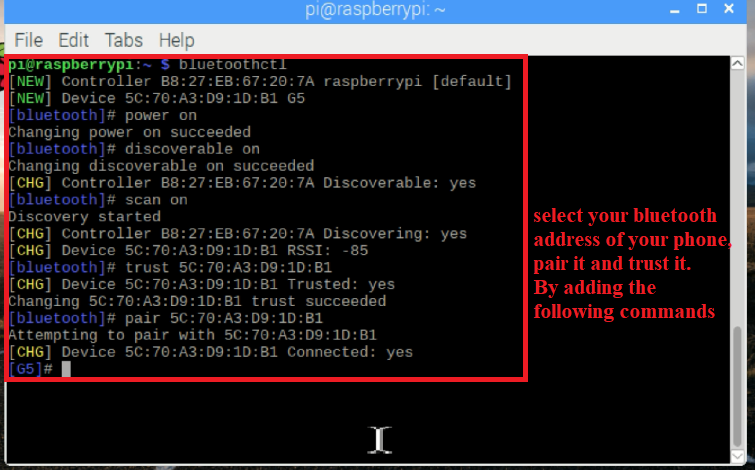
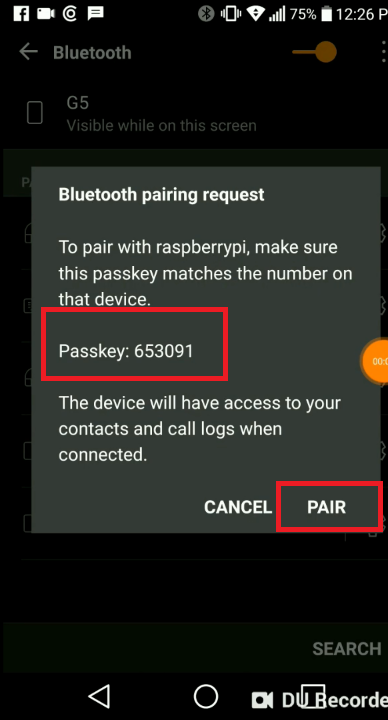
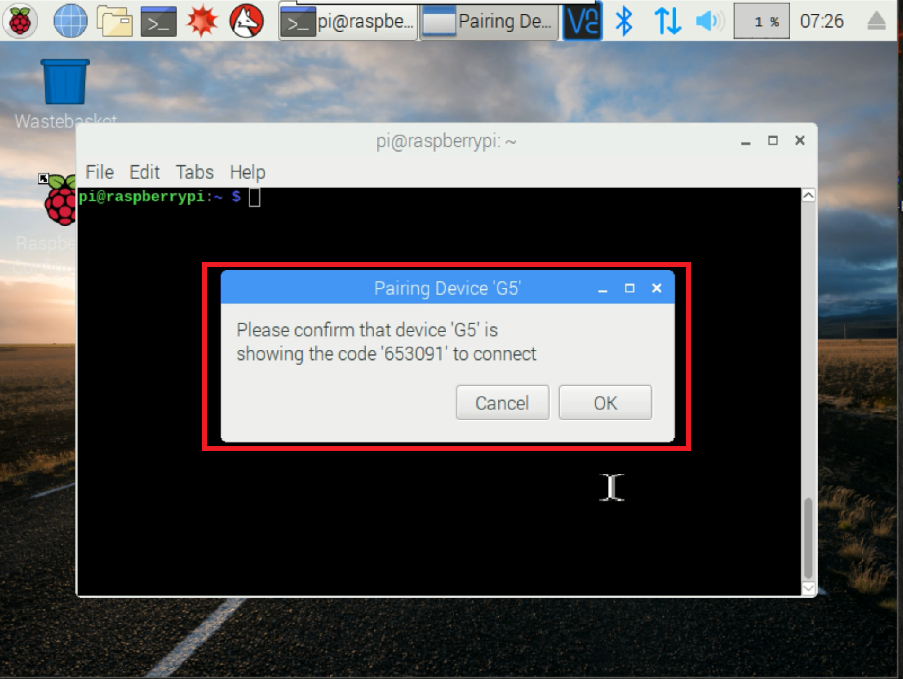
Then, once the pairing process starts inserting the following parameters. (Refer to the image to get a better idea of the flow process)
power on
discoverable on
scan on
At this point, your phone will appear in the list of available devices. Take note of the address of your phone.
trust <PHONE_ADDRESS>
pair <PHONE_ADDRESS>
2. For just exit the bluetooth ctl, write the quit command:
$ quit
3. [OPTIONAL – PRO TIP] You can skip the above setup, by setting up the Bluetooth with UI of Raspbian. Just press the Bluetooth icon, and select your phone Bluetooth.
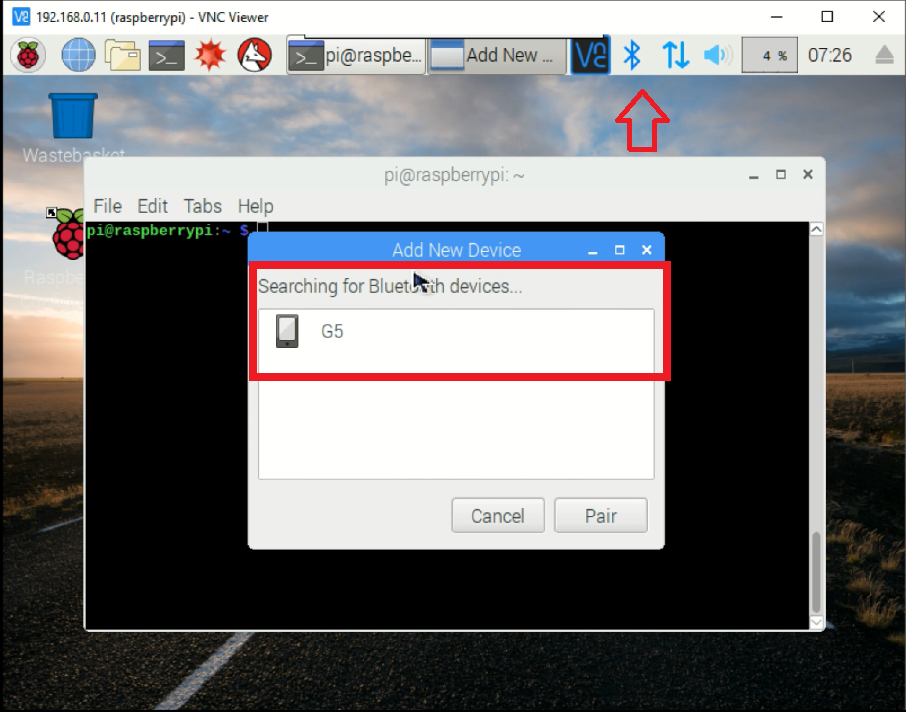
4. After pairing the Bluetooth, add the python script directly into the Raspbian by typing the nano command and copy/paste the source code, or you can directly copy the run.py file.
$ sudo nano run.py
Source code (Copy/Paste):
#!/usr/bin/env python
#Run.py
import os
from bluetooth import *
from wifi import Cell, Scheme
import subprocess
import time
wpa_supplicant_conf = "/etc/wpa_supplicant/wpa_supplicant.conf"
sudo_mode = "sudo "
def wifi_connect(ssid, psk):
    # write wifi config to file
    cmd = 'wpa_passphrase {ssid} {psk} | sudo tee -a {conf} > /dev/null'.format(
            ssid=str(ssid).replace('!', '\!'),
            psk=str(psk).replace('!', '\!'),
            conf=wpa_supplicant_conf
        )
    cmd_result = ""
    cmd_result = os.system(cmd)
    print cmd + " - " + str(cmd_result)
    # reconfigure wifi
    cmd = sudo_mode + 'wpa_cli -i wlan0 reconfigure'
    cmd_result = os.system(cmd)
    print cmd + " - " + str(cmd_result)
    time.sleep(10)
    cmd = 'iwconfig wlan0'
    cmd_result = os.system(cmd)
    print cmd + " - " + str(cmd_result)
    cmd = 'ifconfig wlan0'
    cmd_result = os.system(cmd)
    print cmd + " - " + str(cmd_result)
    p = subprocess.Popen(['hostname', '-I'], stdout=subprocess.PIPE,
                            stderr=subprocess.PIPE)
    out, err = p.communicate()
    if out:
        ip_address = out
    else:
        ip_address = "<Not Set>"
    return ip_address
def ssid_discovered():
    Cells = Cell.all('wlan0')
    wifi_info = 'Found ssid : \n'
    for current in range(len(Cells)):
        wifi_info +=  Cells[current].ssid + "\n"
    wifi_info+="!"
    print wifi_info
    return wifi_info
def handle_client(client_sock) :
    # get ssid
    client_sock.send(ssid_discovered())
    print "Waiting for SSID..."
    ssid = client_sock.recv(1024)
    if ssid == '' :
        return
    print "ssid received"
    print ssid
    # get psk
    client_sock.send("waiting-psk!")
    print "Waiting for PSK..."
    psk = client_sock.recv(1024)
    if psk == '' :
        return
    print "psk received"
    print psk
    ip_address = wifi_connect(ssid, psk)
    print "ip address: " + ip_address
    client_sock.send("ip-address:" + ip_address + "!")
    return
try:
    while True:
        server_sock=BluetoothSocket( RFCOMM )
        server_sock.bind(("",PORT_ANY))
        server_sock.listen(1)
        port = server_sock.getsockname()[1]
        uuid = "815425a5-bfac-47bf-9321-c5ff980b5e11"
        advertise_service( server_sock, "RPi Wifi config",
                           service_id = uuid,
                           service_classes = [ uuid, SERIAL_PORT_CLASS ],
                           profiles = [ SERIAL_PORT_PROFILE ])
        print "Waiting for connection on RFCOMM channel %d" % port
        client_sock, client_info = server_sock.accept()
        print "Accepted connection from ", client_info
        handle_client(client_sock)
        client_sock.close()
        server_sock.close()
        # finished config
        print 'Finished configuration\n'
except (KeyboardInterrupt, SystemExit):
    print '\nExiting\n'
5. After the above step, it’s time to make the script executable by giving the permissions required:
$ chmod +x run.py
To run:
$ sudo ./run.py
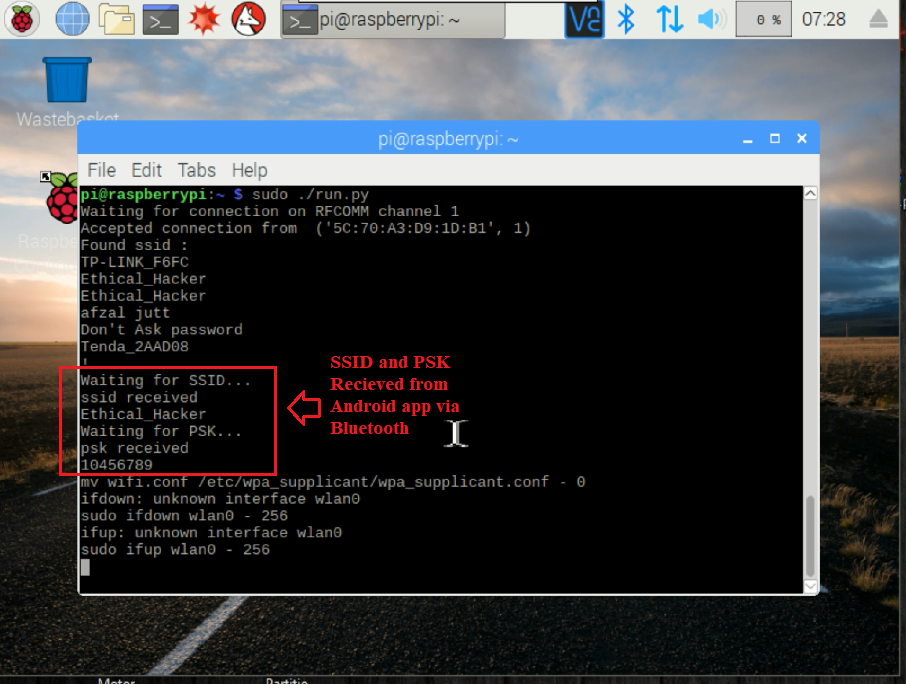
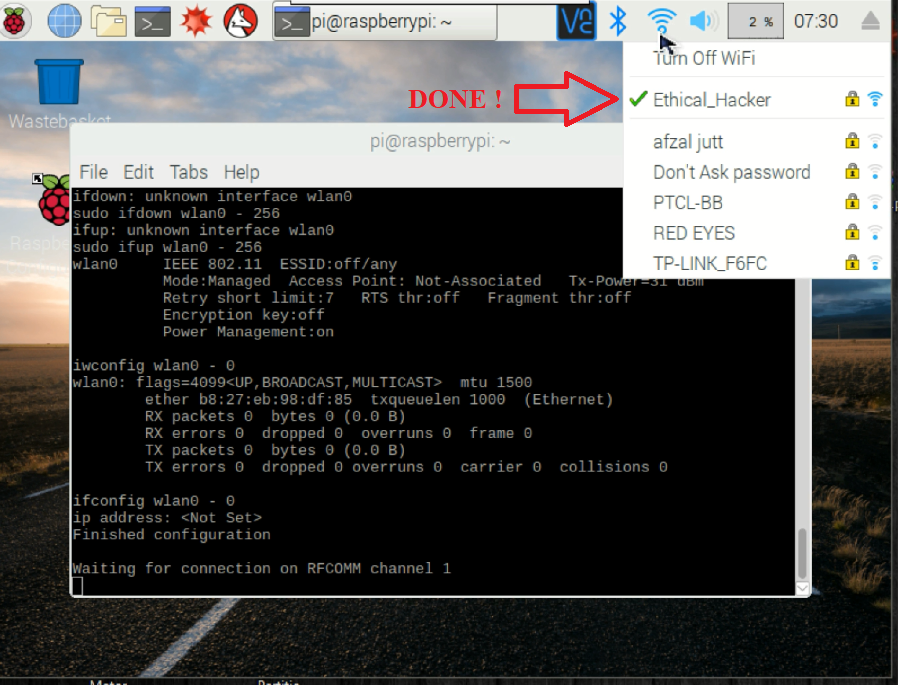
6. At this point, open the android app and select the raspberrypi in the Bluetooth paired devices. Enter the SSID, PSK and Hit the Start Configuration Button. Within a few seconds the Raspberry Pi's Wi-Fi should be connected, as shown in the images below.

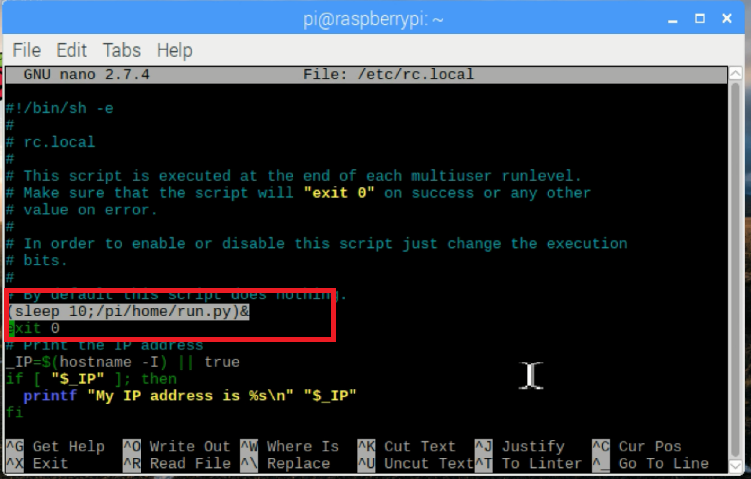
7. To run the script in during the pi’s boot process, edit /etc/rc.local and add the following line of code:
(sleep 10;/path/to/script/./run.py)&
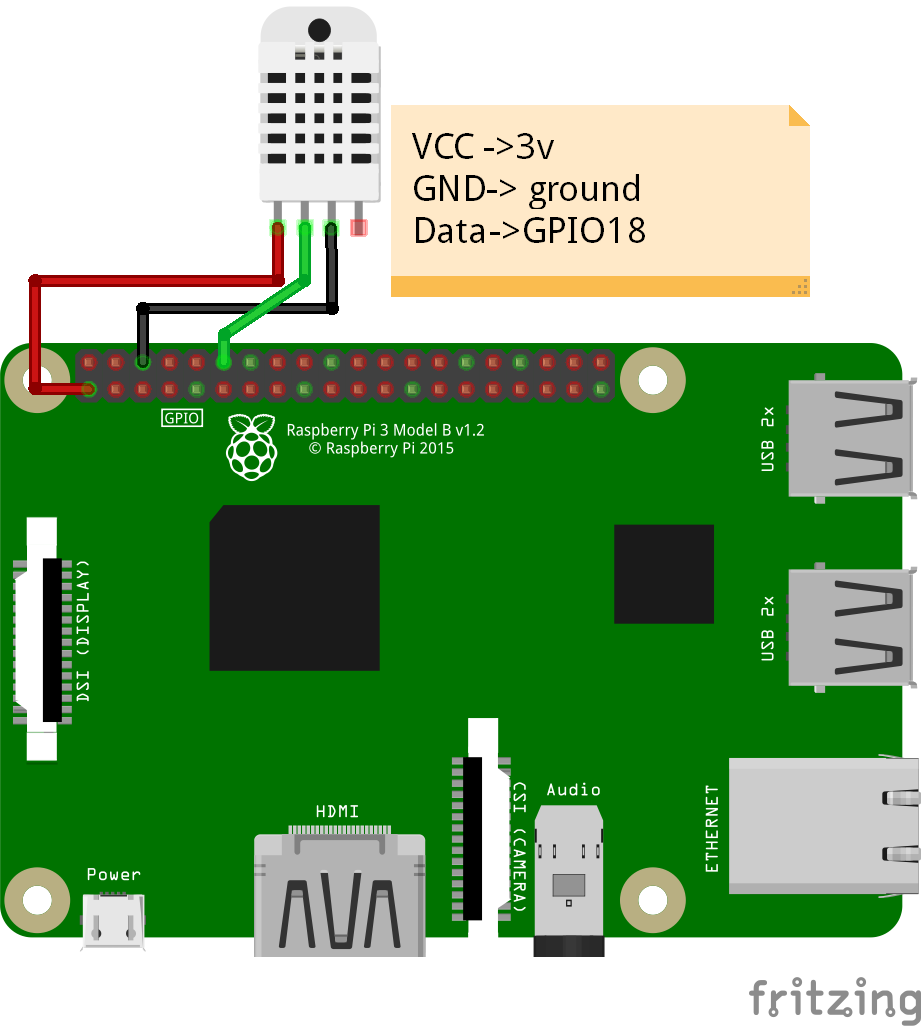
3. Setting up DHT22 Sensor - Hardware
1. Establish the proper connections, as shown in the diagram below:
4. Setting up DHT22 Sensor - Software
1. Install the packages required by running the following commands:
$ sudo apt-get update
$ sudo apt-get install build-essential python-dev python-openssl git
2. Load the sensors’ library. In my case, I use a pre-built Adafruit library that supports a variety of sensors:
$ git clone https://github.com/adafruit/Adafruit_Python_DHT.git && cd Adafruit_Python_DHT
3. With the library already loaded, run the command below to create a Python library which let you make the integration easily for this, and further projects.
$sudo python setup.py install
4. If everything runs properly, we can should be able to read the temperature and humidity. The easiest way is to first use the demo files already available in our Pi:
$ cd examples
5. Run the following sample code. Where the first parameter (11) indicates which sensor was used (22 for the DHT22) and the second, to which GPIO it is connected (not the pin number, but the GPIO number). This produces an output like the following:
$ sudo ./AdafruitDHT.py 11 4
Expected result:
$ sudo ./AdafruitDHT.py 11 4

Temp=24.0*  Humidity=41.0%
5. Sending data to Ubidots
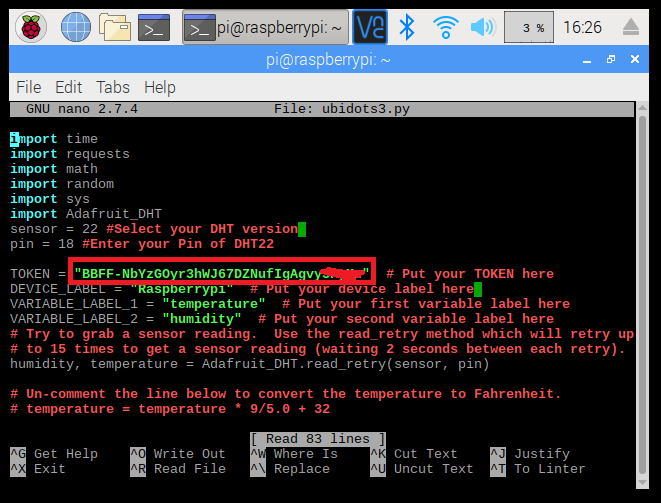
1. Create a python script using nano editor, and paste the code below into the terminal. To do this, insert the following command:
$ sudo nano ubidots3.py
Source code:
import time
import requests
import math
import random
import sys
import Adafruit_DHT
sensor = 22 #Select your DHT version
pin = 18 #Enter your Pin of DHT22
TOKEN = "…"  # Put your TOKEN here
DEVICE_LABEL = "Raspberrypi"  # Put your device label here
VARIABLE_LABEL_1 = "temperature"  # Put your first variable label here
VARIABLE_LABEL_2 = "humidity"  # Put your second variable label here
# Try to grab a sensor reading.  Use the read_retry method which will retry up
# to 15 times to get a sensor reading (waiting 2 seconds between each retry).
humidity, temperature = Adafruit_DHT.read_retry(sensor, pin)
# Un-comment the line below to convert the temperature to Fahrenheit.
# temperature = temperature * 9/5.0 + 32
# Note that sometimes you won't get a reading and
# the results will be null (because Linux can't
# guarantee the timing of calls to read the sensor).
# If this happens try again!
def build_payload(variable_1, variable_2):
	    # Creates two random values for sending data
	value_1 = temperature
	value_2 = humidity
	payload = {variable_1: value_1,
               variable_2: value_2,
               }
	return payload
def post_request(payload):
    # Creates the headers for the HTTP requests
    url = "http://industrial.api.ubidots.com"
    url = "{}/api/v1.6/devices/{}".format(url, DEVICE_LABEL)
    headers = {"X-Auth-Token": TOKEN, "Content-Type": "application/json"}
    # Makes the HTTP requests
    status = 400
    attempts = 0
    while status >= 400 and attempts <= 5:
        req = requests.post(url=url, headers=headers, json=payload)
        status = req.status_code
        attempts += 1
        time.sleep(1)
    # Processes results
    if status >= 400:
        print("[ERROR] Could not send data after 5 attempts, please check \
            your token credentials and internet connection")
        return False
    print("[INFO] request made properly, your device is updated")
    return True
def main():
    payload = build_payload(
    VARIABLE_LABEL_1, VARIABLE_LABEL_2)
    print("[INFO] Attemping to send data")
    post_request(payload)
    print("[INFO] finished")
if __name__ == '__main__':
    while (True):
		print('Temp={0:0.1f}*  Humidity={1:0.1f}%'.format(temperature, humidity))
		humidity, temperature = Adafruit_DHT.read_retry(sensor, pin)
		main()
    time.sleep(1)
    ```
After pasting the source code, you have to assign the Ubidots TOKEN where is indicated in the python script:
$ sudo nano ubidots3.py
2. Now with everything configured, you can run the sample code to start transmitting data to your Ubidots account:
$ sudo python ubidots3.py
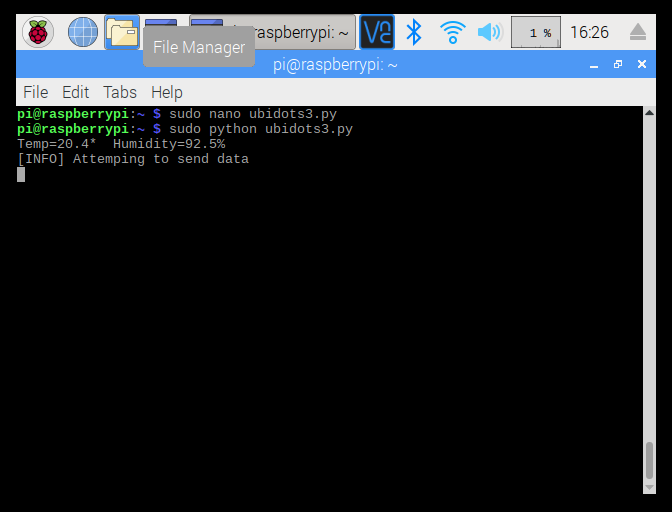
At this point, if you refer to the devices section of your Ubidots account you will be able to see a new device created called “RaspberryPi”.
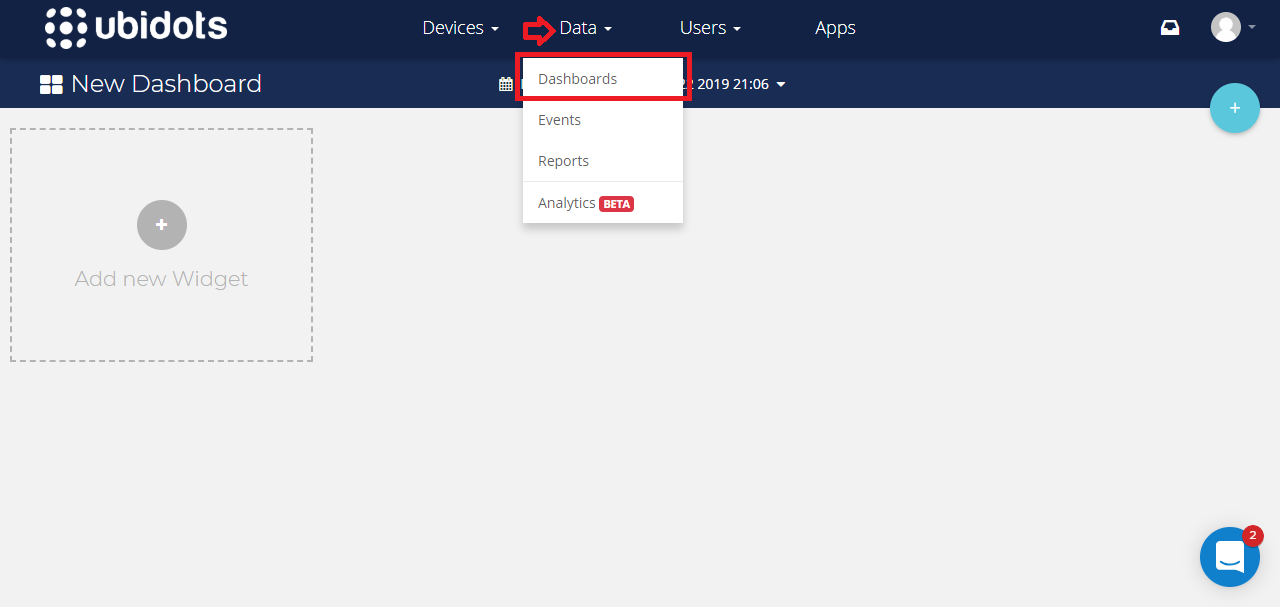
3. To visualize your data efficient way, let’s setup an Ubidots’ Dashboard. To create it, go to the Dashboard section (Data > Dashboard)
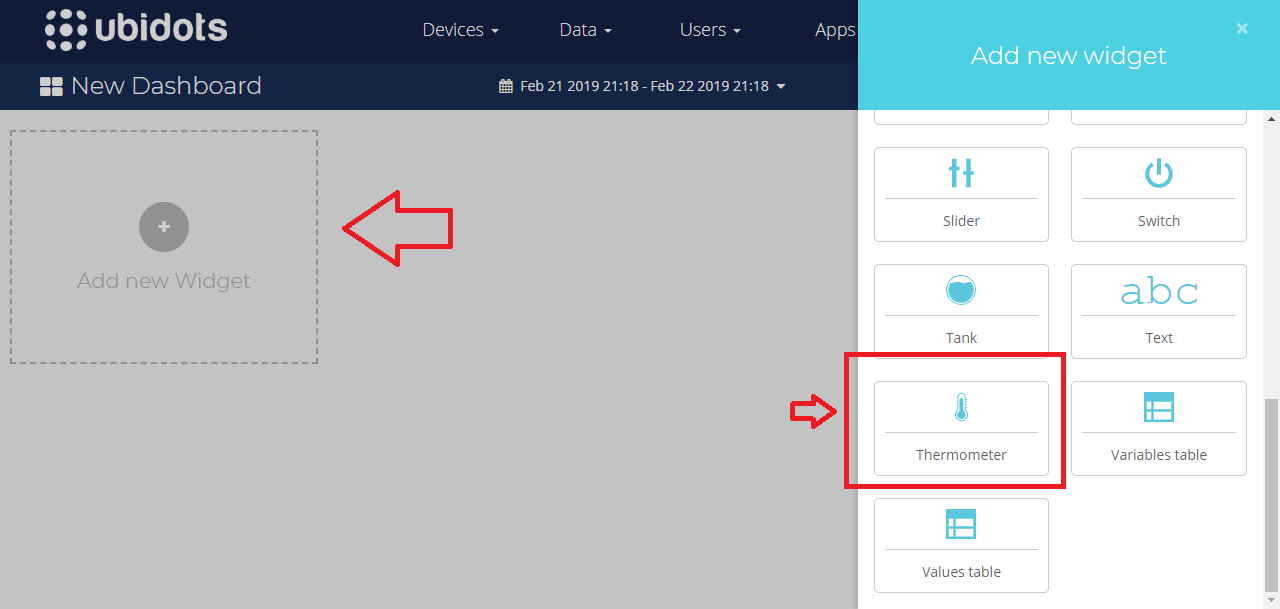
4. Then, press on “Add new Widget”, and select your widget:
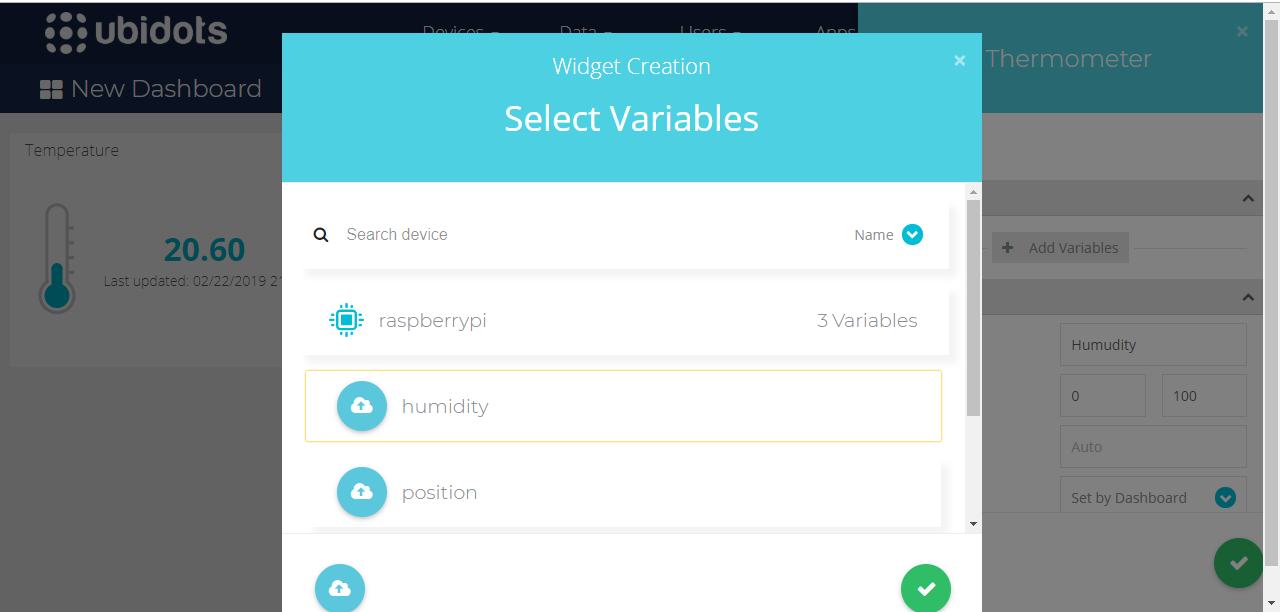
5. Select the variable desired to be displayed:
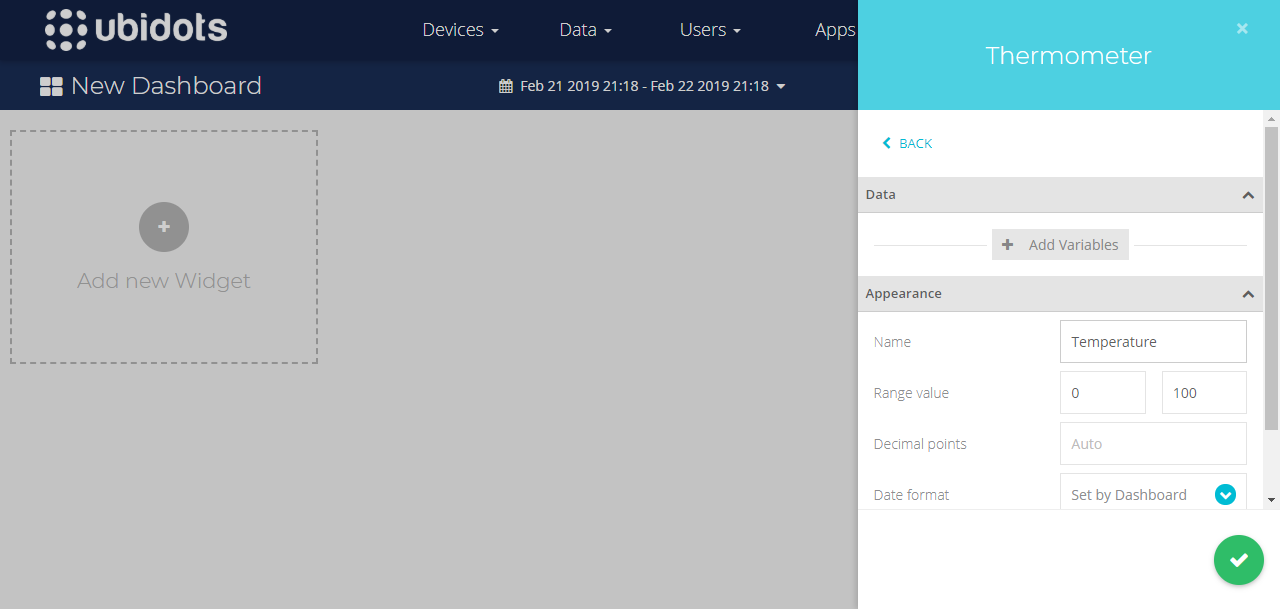
6. Give a customize name to the widget, and press the green icon to finish the widget creation.
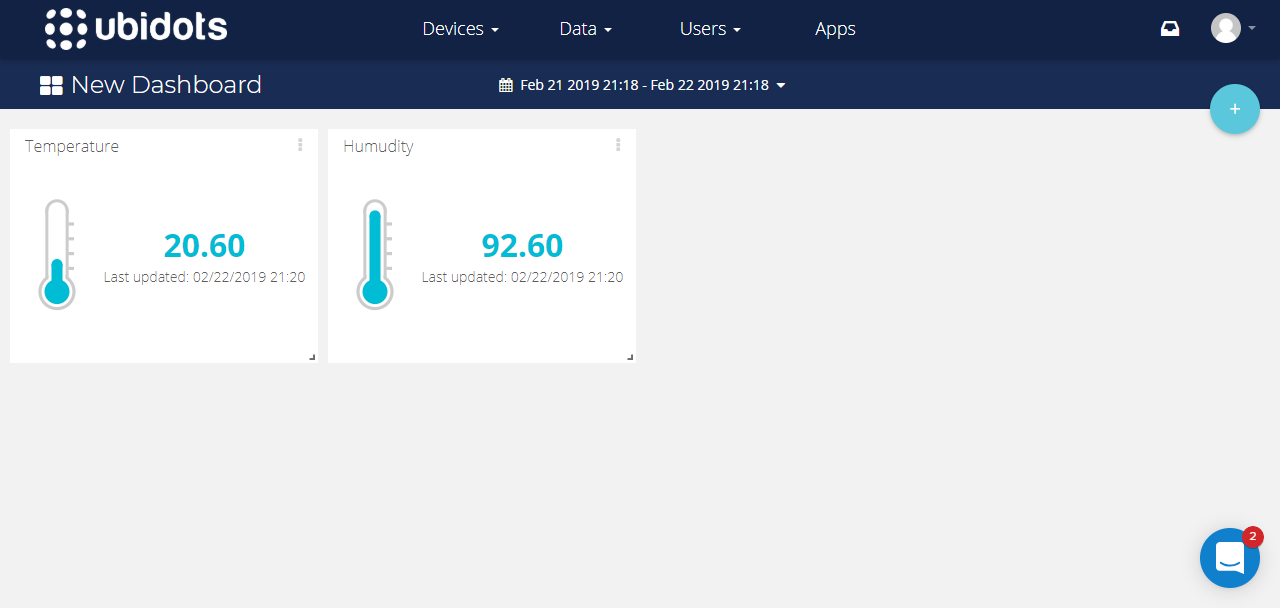
Now you are able to monitor variables remotely from any location thanks to Ubidots IoT Application Development Platform:
Recommended articles: