Advantages & Disadvantages of Finite State Machines: Switch-cases, C/C++ Pointers & Lookup Tables (Part II)
This is the second and final part of our Finite State Machine (FSM) implementation. You can reference the first part of the series and learn some more generalities about Finite State Machines here.
Finite State Machines, or FSMs, are simply a mathematical computation of causes and events. Based on states, an FSM computes a series of events based on the state of the machine’s inputs. For a state called SENSOR_READ for example, an FSM could trigger a relay (aka control event) or send an external alert if a sensor read is higher than a threshold value. States are the FSM’s DNA – they dictate internal behavior or interactions with an environment, such as accepting input or producing output, that may cause a system to change its state. It’s our job as hardware engineers to choose the right FSM states and trigger events to obtain the desired behavior that fits the needs of our project.
In part one of this FSM tutorial, we created an FSM using the classic switch-case implementation. Now, we’ll explore creating an FSM using C/C++ pointers, which will let you develop a more robust application with simpler firmware maintenance expectations.
NOTE: The code used in this tutorial was demonstrated at 2018’s Arduino Day in Bogotá by Jose Garcia, one of Ubidots hardware engineers. You can find the full code examples and speaker notes here.
Switch-Case Disadvantages:
In the first part of our FSM tutorial, we looked at switch-cases and how to implement a simple routine. Now, we’ll expand on this idea by introducing “Pointers” and how to apply them to simplify your FSM routine.
A switch-case implementation is very similar to an if-else routine; our firmware will loop over each case, evaluating them to see if the trigger case condition is reached. Let’s look at a sample routine below:
switch(state) {
case 1:
/* make some stuff for state 1 */
state = 2;
break;
case 2:
/* make some stuff for state 2 */
state = 3;
break;
case 3:
/* make some stuff for state 3 */
state = 1;
break;
default:
/* make some stuff by default */
state = 1;
}
In the above code, you’ll find a simple FSM with three states. In the infinite loop, the firmware will go to the first case, checking if the state variable equals one. If yes, it runs its routine; if not, it proceeds to case 2 where it checks the state value again. If case 2 is not satisfied, the code execution will move along to case 3, and so on until either the state is reached, or the cases have been exhausted.
Before getting into the code, let’s understand a bit more about some possible disadvantages of the switch-case or if-else implementations so we can see how to improve our firmware development.
Let’s suppose that the initial state variable is 3: our firmware will have to make 3 different value validations. This may not be an issue for a small FSM, but imagine a typical industrial production machine with hundreds or thousands of states. The routine will need to make several useless value checks, ultimately resulting in an inefficient use of resources. This inefficiency becomes our first disadvantage – the microcontroller is limited in resources and will be overloaded with inefficient FSM routines. As such, it’s our duty as engineers to save as much computing resources on the microcontroller as possible.
Now imagine an FSM with thousands of states: if you’re a new developer and need to implement a change in one of those states, you’ll have to look into thousands of lines of code inside your main loop() routine. This routine often includes a lot of code not related to the machine itself, so it can be difficult to debug if you center all FSM logic inside the main loop().
And finally, a code with thousands of if-else or switch-case statements isn’t elegant or readable to the majority of embedded programmers.
C/C++ Pointers
Now let’s see how can we implement a concise FSM using C/C++ pointers. A pointer, as its name suggests, points to somewhere inside the microcontroller. In C/C++, a pointer points to a memory address with the intention of retrieving information. A pointer is used to get the stored value of a variable during execution without knowing the memory address of the variable itself. Used properly, pointers can be a huge benefit to the structure of your routine and the simplicity of future maintenance and editing.
- Point Code Example:
int a = 1462;
int myAddressPointer = &a;
int myAddressValue = *myAddressPointer;
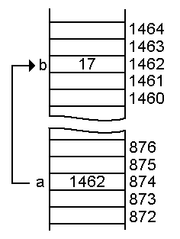
Let’s analyze what happens in the code above. The variable myAddressPointer points to the memory address of variable a (1462), while the variable myAddressValue retrieves the value of the memory address pointed to by myAddressPointer. Accordingly, it can be expected to get a value of 874 from myAddressPointer and 1462 for myAddressValue. Why is this useful? Because we don’t only store values in memory, we also store functions and method behaviors. For example, the memory space 874 is storing the 1462 value, but this storage address can also manage functions to calculate a current intensity in kA. Pointers give us access to this added functionality and memory address usability without the need to declare a function statement in another part of the code. A typical function pointer can be implemented as below:
void (*funcPtr) (void);
Can you imagine using this tool in our FSM? We can create a dynamic pointer that points to the different functions or states of our FSM instead of a variable. If we have a single variable that stores a pointer that changes dynamically, we can change the FSM states based on the input conditions.
Lookup Tables
Let’s review another important concept: lookup tables, or LUTs. LUTs offer an ordered way to store data, in basic structures that stores predefined values. They’ll be useful for us to store data inside our FSM values.
The main advantage of LUTs is this: if statically declared, their values can be accessed through memory addresses, which is a very effective value access way in C/C++. Below you can find a typical declaration for an FSM LUT:

void (*const state_table [MAX_STATES][MAX_EVENTS]) (void) =
{ action_s1_e1, action_s1_e2 }, /* procedures for state
{ action_s2_e1, action_s2_e2 }, /* procedures for state
{ action_s3_e1, action_s3_e2 } /* procedures for state
};
It’s a lot to digest, but these concepts play a big part in implementing our new and efficient FSM. Now, let’s code it so you can see how easily this kind of FSM can grow over time.
Note: The full code of the FSM can be found here – we’ve split it into 5 parts for simplicity.
Coding
We’ll create a simple FSM to implement a blinking led routine. You can then adapt the example for your own needs. The FSM will have 2 states: ledOn and ledOff, and the led will turn off and on every second. Let’s begin!
/*
   STATE MACHINE SETUP

*/

/*
   State machine valid states
*/
typedef enum {
  LED_ON,
  LED_OFF,
  NUM_STATES
} StateType;
/*
   State machine table structure
*/
typedef struct {
  StateType State;
  // Create the function pointer
  void (*function)(void);
} StateMachineType;
In the first part, we’re implementing our LUT to create states. Conveniently, we use the enum() method to assign a value of 0 and 1 to our states. The max number of states is also assigned a value of 2, which makes sense in our FSM architecture. This typedef will be labeled as StatedType so we can refer to it later in our code.
Next, we create a structure to store our states. We also declare a pointer labeled function, which will be our dynamic memory pointer to call the different FSM states.
/*
    Initial SM state and functions declaration
*/
StateType SmState = LED_ON;
void Sm_LED_ON();
void Sm_LED_OFF();
/*
   LookUp table with states and functions to execute
*/
StateMachineType StateMachine[] =
{
  {LED_ON, Sm_LED_ON},
  {LED_OFF, Sm_LED_OFF}
};
Here, we create an instance with the initial state LED_ON, and we declare our two states and finally create our LUT. State declarations and behavior are related in the LUT, so we can access values easily through int indexes. To access the sm_LED_ON() method, for example, we’ll code something like StateMachineInstance[0];.
/*
   Custom State Functions routines
*/
void Sm_LED_ON() {
  // Custom Function Code
  digitalWrite(LED_BUILTIN, HIGH);
  delay(1000);
  // Move to next state
  SmState = LED_OFF;
}
void Sm_LED_OFF() {
  // Custom Function Code
  digitalWrite(LED_BUILTIN, LOW);
  delay(1000);
  // Move to next state
  SmState = LED_ON;
}
In the above code, our methods logic is implemented and includes nothing special besides the state number update at the end of every function.
/*
   Main function state change routine
*/
void Sm_Run(void) {
  // Makes sure that the actual state is valid
  if (SmState < NUM_STATES) {
    (*StateMachine[SmState].function) ();
  }
  else {
    // Error exception code
    Serial.println("[ERROR] Not valid state");
  }
}
The functionSm_Run() is the heart of our FSM. Note that we use a pointer (*) to extract the function memory position from our LUT, since we’ll dynamically access a memory position in the LUT during execution. The Sm_Run() will always execute multiple instructions, aka FSM events, already stored in a memory address of the microcontroller.
/*
   MAIN ARDUINO FUNCTIONS

*/
void setup() {
  // put your setup code here, to run once:
  pinMode(LED_BUILTIN, OUTPUT);
}
void loop() {
  // put your main code here, to run repeatedly:
  Sm_Run();
}
Our main Arduino functions are now very simple – the infinite loop is always running with the state change routine previously defined. This function will handle the event to trigger and update the actual FSM state.
Conclusions
In this second part of our Finite State Machines and C/C++ Pointers series, we reviewed the main disadvantages of switch-case FSM routines and identified pointers as a suitable and desirable option to save memory and increase the microcontroller’s functionality.
In review, here are some of the advantages and disadvantages of using pointers in your Finite State Machine Routine:
Advantages:
- To add more states, simply declare the new transition method and update the lookup table; the main function will be the same.
- You do not have to perform every if-else statement – the pointer lets the firmware ‘go’ to the desired set of instructions in the microcontroller’s memory.
- This is a concise and professional way to implement FSM.
Disadvantages:
- You need more static memory to store the lookup table that stores the FSM events.