Every time we get a new customer, Mario Bros wins a coin
Like any startup, we get excited any time our metrics grow in a positive way, and sometimes we can even get more excited if we win a Mario's coin each time we get a new client... Probably you will be asking how, right?
As a powerful monitoring platform, we immediately decided to use Ubidots to start monitoring metrics in our own dashboards, but what we really wanted was to create a system that could notify all our team members every time we got a new client for us to get excited and celebrating.
One of the first questions was: how can we motivate our entire team on a daily basis by being notified when we get a new client? It was an easy question to answer, we ended up buying some police sirens. But actually, the hard part of the project was to figure out how to integrate common cheap police sirens to Ubidots. A positive characteristic of Ubidots team members is that we all are full-time hackers so we could easily become creative regarding the matter.
To integrate the sirens we decided to buy two ESP8266 customized development boards that would allow us to manage a relay in order to control the state of the light of each siren. Also, we wanted to notify the team but the sound of a police siren could be kind of annoying, so we decided to reproduce the sounds of Mario Bros to make it more exciting and less intrusive.
At the end the result we got was the following one:
The main goal of this post is to share all the technical details of the project with our Ubidots’ community, so you can replicate it to stay informed in real time with anything that could be measured. (If you are starting a YouTube channel this can be a suitable project for you ;) )
Let's start hacking!
Step-by-Step
- Project overview
- Ubidots setup
- Programming
- Wiring
- Summary
Requirements
- (1) Ubidots account
- (2) ESP8266 - 1 channel relay module
- (1) WTV020-SD-16P Mini SD Card MP3 Sound Module
- (1) Metal Speaker w/ Wires - 8 ohm 0.5W
- Electrical cables
- (1) Rotating Police Light - Green
- (1) Rotating Police Light - Red
1. Project overview
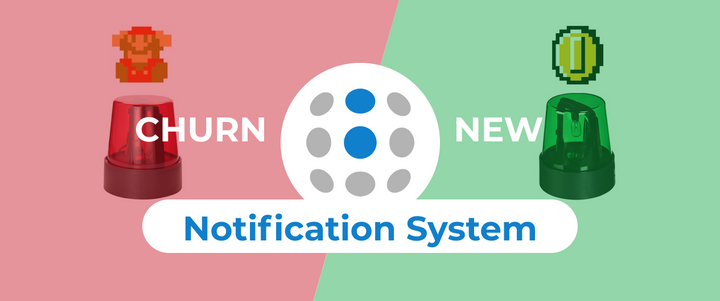
As we previously mentioned, we decided to buy two police sirens to be notified each time we get a new client or when there is a churn, differentiating the sirens by their colors. If the green siren turns on, it means we got a new client. If the red siren turns on, it means we lost a client.
To be able to control the sirens based on the clients status, we integrated Ubidots core metrics into an Ubidots account by using an UbiFunction, a feature that allows you to create your own API and gain access to data, APIs, and tools using HTTPS. This guide won't cover how to handle the UbiFunction, in case you're interested in getting more details, check out this guide.
With the clients' metrics already integrated into an Ubidots account, we proceeded with some few configurations on the platform to set up some variables. Then, we had to establish a subscription to the variables over MQTT to trigger the respective relay, the green siren or red siren, and here is where the magic happens. - Mario wins a coin, or loses a life... We have to be realistic!
2. Ubidots Setup
The variables in charge of reporting the clients’ status are going to be automatically created after setting up the UbiFunction. Just for testing purposes, we're going to create a new device with the desired variables to be handled.
If you want to handle data from your YouTube channel, Twitter, Instagram, or basically, to keep an eye on any metric at work, all you have to do is to refer to their API documentation to consume it using the UbiFunction. At this point, you'll be able to get the metrics in order to post them directly to your Ubidots account.
With nothing else to say, let's get into the details on how to set up an Ubidots event in order to avoid false-positive results. We really don't want to make our team celebrate in vain.
1) Go to the “Device” section of your Ubidots account and create a new device called "customer". To create a new device click the blue plus sign located at the right upper side of the screen. Then, select “Blank” devices and assign the name defined.
2) Enter to the device previously created and include 2 new raw variables. To create the variables, go to the device section, click “Add Variable > Raw” and assign a name for the variable to be created. For this project, we named the variables with.
- churn: variable in charge of receiving a positive flag (1) every time a client churn
- new-client: variable in charge of receiving a positive flag (1) every time we get a new client.
With the variables already receiving data, it's time to handle a few tricks to avoid false-positives in case our devices lost their connection.
3) The modules installed work under MQTT as a communication protocol. If you are not familiar with it, we highly recommend you take a look at the official documentation.
This protocol has a special characteristic which is called "Retained Message". Basically, it allows the broker to keep the last message of a specific topic by setting the retained message flag, so any time a device establishes a subscription with the topic, the broker automatically returns the last message retained.
Based on this, we decided to set up an Ubidots Event to set the variable "churn" and "new-client" to 0 right after the positive flag (1) is received. What we're looking with this is to avoid a false positive in case the sirens lost the internet connection.
Imagine if the green siren was activated and all of a suddenthe WiFi module lost its connection. What could be happening?... Once the WiFi module reestablishes its connection, the siren will reestablish the subscription as well with the variable "new-client", and if the last value was the positive flag - 1, it would automatically turn on the siren again when the notification for that client was an old one.
To setup an Ubidots Event go to “Data > Events” tab into your Ubidots account. Then, create a new event selecting "+ Add event". In the event configuration setup, select the Device and the Variable with which you want to configure the conditions for your Event, in our case the device is “customer” and the variables are “churn” and “new-client”.
NOTE: This event has to be created for both variables independently.
With the variable already selected, make sure the event's trigger has the following setup:
- "new-client" (variable) - Value -> is equal to - 1 for 0 minutes.
To proceed with the action setup, press the right arrow located at the bottom right of the page. Select "Set variable" as an action, choose the same variable related to the trigger and assign "0" as the value.
To finish, save the changes by pressing the right arrows.
Once the event is successfully created, repeat the same process to create a second event for the missing variable.
After setting up the events, the expected behavior is that every time the variable receives the positive flag a value equal to 1 will go to 0 automatically. For a better understanding refer to the image.
4. As you probably already noticed, the variables that are reporting the "new-clients" and "churns" are just updating a positive flag each time Ubidots core updates one of the variables, we also want to know the total of new clients or churns we have. For this, we have to set up a Synthetic Variable that will sum the total flags received in the variable for a defined period of time.
To create the Synthetic variable, select "+Add variable > Synthetic" inside the device "customer". Then, apply the following formula:
sum(x, data_range) : Returns the summation of the dots in the specified data_range.
Where:
- X: is the variable desired
- Data_range: the period of time desired to return the summation.
The final formula for each variable should be:
- sum(“new-client”, “1M”)
- sum(“churn”, “1M”)
To finish with the variable creation, select “accept” and assign any name you want.
At this point, you will be able to see the total of new clients or churns occurring during a month.
5. Now with your Ubidots account already configured, it's your time to be creative and build a customized dashboard to display all your data in one place. Check out this guide to learn all the details about the different widgets you can set up on your Ubidots account.
3. Programming
3.1. Sirens control
The module in charge of handling the status control of the sirens is the ESP8266 + 1 Channel relay. The base code for both sirens are going to be the same, the only change you'll notice is in the variable label. You must assign the respective variable label where you want the ESP8266 module to establish the connection with to activate the right siren.
1. To be able to work with the ESP8266 platform in the Arduino IDE, you’ll need to install the ESP8266 platform using the preconfigured Arduino Board Manager. If you’re not familiar with adding a board with the Arduino IDE, refer to this article for additional guidance.
2. With the ESP8266 platform installed, select the ESP8266 device you are working with. In the case, we are working with a “Generic ESP8266 Module”. To select your board from the Arduino IDE, select Tools > Board “Generic ESP8266 Module”.
3. Download and install the UbidotsMQTTESP8266 library. For a detailed explanation of how to install libraries using the Arduino IDE, refer to this guide.
4. Now, with the following sample codes, you will be able to subscribe to the variables that are reporting the values.
Once you have inserted the code, you will need to assign your unique Ubidots TOKEN, SSID (WiFi Name) and Password of the available network. In case your variables and device are managing a different label than the ones used in this guide, make sure to assign the right ones.
- Sample code for the Red Siren:
/****************************************
 * Include Libraries
 ****************************************/
#include "UbidotsESPMQTT.h"

/****************************************
 * Define Constants
 ****************************************/
#define TOKEN "***" // Your Ubidots TOKEN
#define WIFINAME "***" //Your SSID
#define WIFIPASS "***" // Your Wifi Pass
#define DEVICE_LABEL "customers"  // Put here your Ubidots device label
#define VARIABLE_LABEL "churn"  // Put here your Ubidots variable label

Ubidots client(TOKEN);

byte relayOn[] = {0xA0, 0x01, 0x01, 0xA2}; //0xA00101A2
byte relayOff[] = {0xA0, 0x01, 0x00, 0xA1}; //0xA00100A1

/****************************************
 * Auxiliar Functions
 ****************************************/

void callback(char* topic, byte* payload, unsigned int length)
{
  if ((char)payload[0]=='1') // Relay on
  {
    Serial.write(relayOn, sizeof(relayOn));
    delay(10000);
    Serial.write(relayOff, sizeof(relayOff));
  }
}

/****************************************
 * Main Functions
 ****************************************/

void setup() {
  // put your setup code here, to run once:
  client.ubidotsSetBroker("business.api.ubidots.com"); // Sets the broker properly for the business account
  client.setDebug(false); // Pass a true or false bool value to activate debug messages
  client.wifiConnection(WIFINAME, WIFIPASS);
  client.begin(callback);
  client.ubidotsSubscribe(DEVICE_LABEL, VARIABLE_LABEL); //Insert the dataSource and Variable's Labels
  Serial.begin(9600);
  }

void loop()
{
  if(!client.connected())
  {
    client.reconnect();
    client.ubidotsSubscribe(DEVICE_LABEL, VARIABLE_LABEL); //Insert the dataSource and Variable's Labels
  }
  client.loop();
}
- Sample code for the Green Siren:
/****************************************
 * Include Libraries
 ****************************************/
#include "UbidotsESPMQTT.h"

/****************************************
 * Define Constants
 ****************************************/
#define TOKEN "***" // Your Ubidots TOKEN
#define WIFINAME "***" //Your SSID
#define WIFIPASS "***" // Your Wifi Pass
#define DEVICE_LABEL "customers"  // Put here your Ubidots device label
#define VARIABLE_LABEL "new-customer"  // Put here your Ubidots variable label

Ubidots client(TOKEN);

byte relayOn[] = {0xA0, 0x01, 0x01, 0xA2}; //0xA00101A2
byte relayOff[] = {0xA0, 0x01, 0x00, 0xA1}; //0xA00100A1

/****************************************
 * Auxiliar Functions
 ****************************************/

void callback(char* topic, byte* payload, unsigned int length)
{
  if ((char)payload[0]=='1') // Relay on
  {
    Serial.write(relayOn, sizeof(relayOn));
    delay(10000);
    Serial.write(relayOff, sizeof(relayOff));
  }
}

/****************************************
 * Main Functions
 ****************************************/

void setup() {
  // put your setup code here, to run once:
  client.ubidotsSetBroker("business.api.ubidots.com"); // Sets the broker properly for the business account
  client.setDebug(false); // Pass a true or false bool value to activate debug messages
  client.wifiConnection(WIFINAME, WIFIPASS);
  client.begin(callback);
  client.ubidotsSubscribe(DEVICE_LABEL, VARIABLE_LABEL); //Insert the dataSource and Variable's Labels
  Serial.begin(9600);
  }

void loop()
{
  if(!client.connected())
  {
    client.reconnect();
    client.ubidotsSubscribe(DEVICE_LABEL, VARIABLE_LABEL); //Insert the dataSource and Variable's Labels
  }
  client.loop();
}
5. Verify your code within the Arduino IDE. To do this, in the top left corner of our Arduino IDE you will see the "Check Mark" icon; select it to verify your code.
6. Upload the code into your “Generic ESP8266 Module”. To do this, choose the "right-arrow" icon beside the "check mark" icon.
7. To verify the connectivity of the device and the data sent, open the serial monitor by selecting the "magnifying glass" icon in the top right corner of the Arduino IDE to see the connectivity logs.
3.2. Sounds control
The module in charge of handling the MP3 control is the WEMOS D1. Basically, the code establishes the subscription with the same variables configured with each siren but this would also reproduce the Mario Bros sounds. Remember:
- If the green siren turns on, the speaker will reproduce the sound of Mario Bros winning a coin - Ubidots gets a new client.
- If the red siren turns on, the speaker will reproduce the sound of Mario Bros losing a life - Ubidots loses a new client.
1. With the ESP8266 platform installed, select the ESP8266 device you are working with. In this case, we are working with a “WeMos D1”. To select your board from the Arduino IDE, select Tools > Board “WeMos D1”.
2. In case you didn't do it in the previous step, download and install the UbidotsMQTTESP8266 library. For a detailed explanation of how to install libraries using the Arduino IDE, refer to this guide.
3. Place the following code in your Arduino IDE. Once you have pasted the code, you make sure you assign your unique Ubidots TOKEN, SSID (WiFi Name) and Password of the available network.
/****************************************
 * Include Libraries
 ****************************************/
#include "UbidotsESPMQTT.h"

/****************************************
 * Define Constants
 ****************************************/
#define TOKEN "***" // Your Ubidots TOKEN
#define WIFINAME "***" //Your SSID
#define WIFIPASS "***" // Your Wifi Pass
#define DEVICE_LABEL "customers"  // Put here your Ubidots device label
#define RED_SIREN "churn"  // Put here your Ubidots variable label
#define GREEN_SIREN "new-customer"  // Put here your Ubidots variable label

#define RESET D5
#define NEXT D6
#define PLAY D7

Ubidots client(TOKEN);

/****************************************
 * Auxiliar Functions
 ****************************************/
void activate(int pin)
{
  digitalWrite(pin, LOW);
  delay(500);
  digitalWrite(pin, HIGH);
}

void callback(char* topic, byte* payload, unsigned int length)
{
  char val = payload[0];
  //Serial.println(topic);

  if (strstr(topic,"new-customer") && val == '1')
  {
    activate(RESET);
    activate(PLAY);
    delay(2000);
  }
  else if (strstr(topic,"churn") && val == '1')
  {
    activate(RESET);
    activate(NEXT);
    delay(2000);
  }
}

/****************************************
 * Main Functions
 ****************************************/

void setup() {

  pinMode(RESET, OUTPUT);
  pinMode(NEXT, OUTPUT);
  pinMode(PLAY, OUTPUT);

  digitalWrite(RESET, HIGH);
  digitalWrite(NEXT, HIGH);
  digitalWrite(PLAY, HIGH);

  // put your setup code here, to run once:
  client.ubidotsSetBroker("industrial.api.ubidots.com"); // Sets the broker properly for the business account
  client.setDebug(false); // Pass a true or false bool value to activate debug messages
  client.wifiConnection(WIFINAME, WIFIPASS);
  client.begin(callback);
  client.ubidotsSubscribe(DEVICE_LABEL, GREEN_SIREN); //Insert the dataSource and Variable's Labels
  client.ubidotsSubscribe(DEVICE_LABEL, RED_SIREN);
  Serial.begin(9600);
  }

void loop()
{
  if(!client.connected())
  {
    client.reconnect();
    client.ubidotsSubscribe(DEVICE_LABEL, GREEN_SIREN); //Insert the dataSource and Variable's Labels
    client.ubidotsSubscribe(DEVICE_LABEL, RED_SIREN);
  }
  client.loop();
}
4. Verify your code within the Arduino IDE. To do this, in the top left corner of our Arduino IDE you will see the "Check Mark" icon; select it to verify your code.
5. Upload the code into your “WeMos D1”. To do this, choose the "right-arrow" icon beside the "check mark" icon.
6. If you're not familiar with the MP3 module, we highly recommend you check out this guide, one of the best to start with.
Based on our experience, make sure you are using the right format for the SD and also for the songs to be played.
- Size Micro SD Card: 1 or 2 GB as maximum.
- Micro SD Format: FAT - We recommend you to format your SD card using SD Card Formatter.
- Songs Format: AD4 - We recommend you use AD4Converter.
To save you a few minutes of work, in this folder you'll find the Mario Bros’ sounds used for the project.
Based on the logic used in the code, the first song identified in the Micro SD card as "0000" will reproduce the Mario Bros' sound when he’s winning a coin, and the second one identified as "0001" will reproduce the Mario Bros' sound when he lost a life.
4. Wiring
IMPORTANT NOTE: Before establishing all the connections in conjunction, make sure the boards have the sample code already uploaded. Also, make sure they are working properly with your Ubidots account.
To make the wiring easy to understand, I divided this process into different steps. Follow the diagram and the wiring table shown below to establish the proper connections.
- MP3 Module control
To integrate the ESP8266 + 1 channel relay module with the sirens we had to do a few modifications to the original wiring of each siren. Basically, we have removed the manual switch of each siren to replace it with the relay module.
To be able to power each ESP8266 + 1 channel relay module, we used a cell phone charger to regulate the input voltage from 110V to 5V.
Please refer to the diagram below to have a reference of how to establish the modification to the original wiring of the sirens, also on how to power up the ESP8266 modules.
- MP3 Module control
The MP3 module has different configurations. Based on the requirements needed for this project, we decided to use the "MP3 mode application circuit".
Refer to the wiring table and diagram below to establish the proper configurations.
- All system
To finish, power up the WEMOS board with the 5V output of the regulator used.
With the proper wire connections already established, place all the components inside the sirens and proceed with the installation of the sirens. In our case, we decided to place them on the main wall of our office.
5. Summary
We really enjoyed the hacking time in rebuilding the functionality of the police sirens to notify all the team about the clients status in real time, but in a funny way using Mario Bros sounds.
We know this is an internal project that could not be not as useful to everyone, but we find it relevant for all of those who are starting their YouTube channels, blogs or even in a company and want to track metrics in a friendly way and in real-time every time you get new subscriber, visitor or a client.
If you're a passionate maker like us and you decide to reproduce this project, feel entirely free to share it, but don't forget to tag us at @ubidots through our social media (facebook, linkedin, twitter, instagram). It will be a pleasure for us to share it with Ubidots’ Community.
More useful IoT projects:
