Mobile RFID reader - a Maker Kit project using Particle & Ubidots
During the past few years, Ubidots has teamed up with Particle to realize an ultimate goal; enabling quick, easy and efficient creation of IoT solutions.
Fast forward to the present day and we’re proud to state that both products are being used to accelerate IoT projects on a global level. From entrepreneurs and start-ups to both large and small companies, we are helping businesses create the data-driven future.
Recently, Friedl took the challenge of creating an IoT product from scratch. From the outset, Friedl’s knowledge on the subject was limited. However, thanks to the research he conducted - and many Youtube videos-, he became confident in using a variety of tools to materialize his goal; Creating a mobile RFID reader without being an IoT expert.
After achieving this astounding result, we got in touch with Friedl to both congratulate him on his success, and learn from his achievement. We also wanted to share this story with the Ubidots Community because we believe it’s one to inspire and learn from.
In light of these great achievements, my interview will explore Friedl’s development process, the techniques he used to reach his goal, and other valuable lessons.
The original post can be found on Particle Community's site. Friedl has kindly shared it with Ubidots’ Blog too.
Written by: friedl_1977
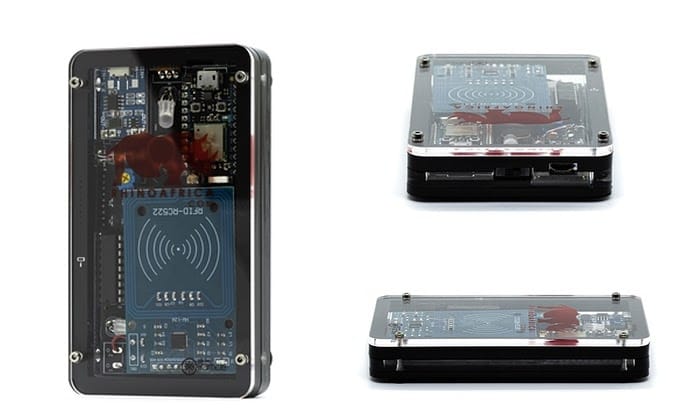
As a first project I set out to build a mobile RFID reader posting live data to either MySQL, Google Sheets or Ubidots via Webhooks.
- photo credit: Migal Vanas
Note:
This is not a tutorial as such, rather just a showcase of the product. As I have had much help from the Particle Forum, I have decided to publish my Eagle files and code to make it available to anyone that might want to use it.
I assume you have basic knowledge of the Particle environment, web hooks and have set up your account and devices in Particle Console. If not, please do so before attempting this build.
The brief:
Building a truly wireless (mobile) RFID scanner with the purpose of scanning RFID cards, capturing the UID’s off these cards and posting them to either;
Bill of materials:
- MFRC522 3 card reader module
- 3.7V LiPo 1 1100mA Battery
- Battery Charing 1 module
- LM394N 1
- Bunch of 0603 LEDs for battery indicator
- 2 x RGB LEDs for system status and card read status
- Particle Photon
- Slide switch - Main power
- Tilt 1 switch
- Custom design PCB (from PCBWAY or similar)
- Custom design enclosure
- Various 0603 resistors
- Ferrite 2 !!!
First things first:
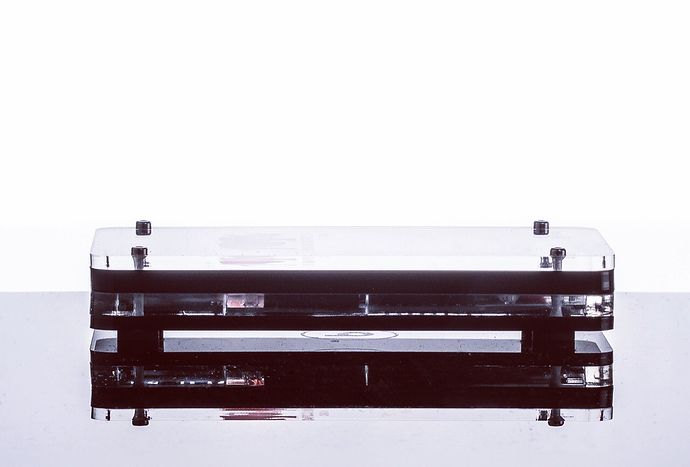
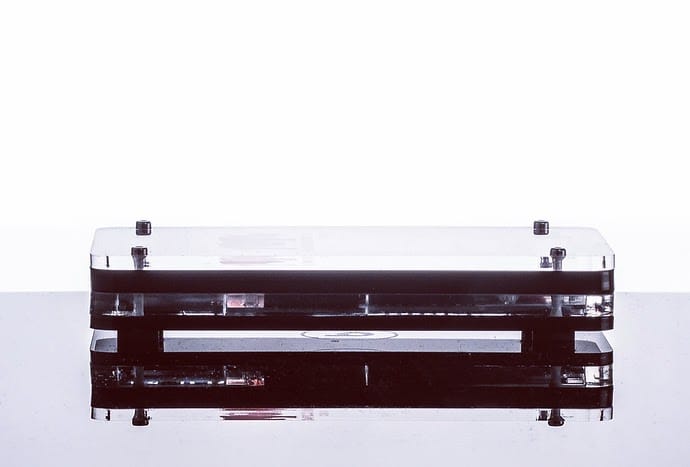
If you are anything like me, simple generic prototype enclosure will not suffice, so I put a little extra effort in, got to know my way around Rhinoceros and designed a simple, yet elegant (or at least I thought so) enclosure that would showcase the Particle Photon and some other components.
In addition to this, I decided not to opt for a generic proto board as I absolutely HATE wires. I included an image of my initial attempt to make a “pretty” board using proto board and jumper wires, but after a couple of hours realised it simply won’t do. Yet another learning curve, Google’d and spent a couple of hours on YouTube and managed to find my way around Autodesk Eagle. Worth every minute spent.
***The last image indicating the fully assembled PCB with status LED indicating "OK" as well as the LM3914N in action indicating ±90% charged battery. (7 of 8 LED’s)
Submitted the Gerber files to PCBWAY and in less than a week and In had my brand new custom PCB’s ready for assembly.
The important stuff:
Now the coding, this is the part that I struggle with the most, but thanks to some helpful gentleman on the Particle and Hackster forums, I came up with the code below. Now it probably is not the cleanest code ever written, but it works, so feel free to use and improve if you’d like.
//  Project:        Mobile RFID Attendance register
//                      A project by FireFli (PTY) LTD
//  Date:                July 2019
//  Compiled by:    Friedl Basson
//  Details:            Scan for UID's from RFID cards and posting via webhooks to, UbiDots, mySQL DB or Google Sheets
//  Credits:            Special thanks to the Particle community for assisting and making this project possible!
//  Firmware:       V2.1.1
//System Mode// - comment out if you will be setting up WiFi via Particle app and do not need to connect to another Wireless network after the fact
//SYSTEM_MODE(SEMI_AUTOMATIC);
// This #include statement was automatically added by the Particle IDE.
#include "RFID.h"
#include <Ubidots.h>
/* Define the pins used for the SS (SDA) and RST (reset) pins for BOTH hardware and software SPI */
#define SS_PIN      A2
#define RST_PIN     D2
/* Define the pins used for the DATA OUT (MOSI), DATA IN (MISO) and CLOCK (SCK) pins for SOFTWARE SPI ONLY */
#define MOSI_PIN    D3
#define MISO_PIN    D4
#define SCK_PIN     D5
//Initialising RGB START  - RGB LED and buzzer is used as system status indicator
int redPin = D6;
int greenPin = D1;
int bluePin = D0;
int buzzPin = D7;
//Initializing RGB END
/* Create an instance of the RFID library */
#if defined(_USE_SOFT_SPI_)
    RFID RC522(SS_PIN, RST_PIN, MOSI_PIN, MISO_PIN, SCK_PIN);    // Software SPI
#else
    RFID RC522(SS_PIN, RST_PIN);                                 // Hardware SPI
#endif
//const char* WEBHOOK_NAME = "rfid_uid";
const char* WEBHOOK_NAME = "Ubidots";
Ubidots ubidots("webhook", UBI_PARTICLE);
void setup()
{
  Serial.begin(9600);
//  WiFi.listen();
        pinMode(redPin, OUTPUT);
        pinMode(greenPin, OUTPUT);
        pinMode(bluePin, OUTPUT);
        pinMode(buzzPin, OUTPUT);
// Setting credentials for new WiFi Connection
/*
    This section is only needed if you want to connect to a new WiFi Network after initial setup
    This will only work if current WiFi credentials have been cleared.
    Code will run ONLY ONCE on startup and set new credentials specified.  Once new credentials is set, this code will not run again.
*/
WiFi.on();
if (!WiFi.hasCredentials()) {
WiFi.setCredentials("SSID", "PASSWORD", WPA2, WLAN_CIPHER_AES);
}
WiFi.connect();
waitUntil(WiFi.ready);
Particle.connect();
#if !defined(_USE_SOFT_SPI_)
  /* Enable the HW SPI interface */
  SPI.setDataMode(SPI_MODE0);
  SPI.setBitOrder(MSBFIRST);
  SPI.setClockDivider(SPI_CLOCK_DIV8);
  SPI.begin();
#endif
  /* Initialise the RFID reader */
  RC522.init();
delay(5000);
            digitalWrite(bluePin, HIGH);
            digitalWrite(greenPin, HIGH);
            digitalWrite(redPin, LOW);
}
void loop()
{
  /* Temporary loop counter */
  uint8_t i;
  /* Has a card been detected? */
  if (RC522.isCard())
  {
    /* If so then get its serial number */
    RC522.readCardSerial();
  char str[16];
  snprintf(str, sizeof(str)
          , "%02X %02X %02X %02X"
          , RC522.serNum[0]
          , RC522.serNum[1]
          , RC522.serNum[2]
          , RC522.serNum[3]
          );
// Webhooks//
/*
RFID_WP = your webhook name
str = your data you want to publish
PRIVATE or PUBLIC
*/
//            Particle.publish("RFID_WP", str, PRIVATE);          //Publish Data to Wordpress DB
//            Particle.publish("XLS", str, PRIVATE);              // Publish Data to Google Sheets
        Serial.print(str);
/* Adds context key-value pairs */
    ubidots.addContext("UID", str);
    char* context = (char *) malloc(sizeof(char) * 60);
    /* Builds the context with the array above to send to Ubidots */
    ubidots.getContext(context);
    ubidots.add("UID", 1, context);  // Change for your variable name
    bool bufferSent = false;
    bufferSent = ubidots.send(WEBHOOK_NAME, PUBLIC);  // Will use particle webhooks to send data
//}
// - TRY Ubidots - //
//            digitalWrite(buzzPin, HIGH);
            delay(500);
            digitalWrite(buzzPin, LOW);
            digitalWrite(bluePin, LOW);
            delay(750);
            digitalWrite(bluePin, HIGH);
}
else if (RC522.isCard())
  {
    RC522.readCardSerial();
 char str[16];
  snprintf(str, sizeof(str)
          , "%02X %02X %02X %02X"
          , RC522.serNum[0]
          , RC522.serNum[1]
          , RC522.serNum[2]
          , RC522.serNum[3]
          );
            digitalWrite(bluePin, LOW);
            digitalWrite(greenPin, LOW);
            digitalWrite(redPin, HIGH);
 //         digitalWrite(buzzPin, HIGH);
            delay(1000);
            digitalWrite(bluePin, HIGH);
            digitalWrite(greenPin, HIGH);
            digitalWrite(redPin, LOW);
            digitalWrite(buzzPin, LOW);
    }
  delay(500);
}
Front Ends:
Thanks to the webhook function in the Particle Console, I was able to seamlessly post the code to just about anywhere. Now if you know PHP and MySQL quite well, you might be able to write your own server side script, but for those who are new to this like me, I would recommend the following two services;
They differ vastly, so you have a look at both to determine which is more suitable for your use. Bottom line, if you want the data to be published live to a location of your choice, Zapier (or something similar) is the way to go. If you do not mind storing data on someone else’s server, Ubidots is a much more cost effective (cost per data points) way to go and has the added benefit of some nifty widgets to present your data in a graphical way. I have attached a screen grab of a sample Dashboard I build in Ubidots.
- photo credit: Migal Vanas
In hindsight:
Initially I thought tnat building a battery indicator that works outside of the Microcontroller was the best idea as It would function independently and it frees up much needed digital pins, but the trade-off to this is that without an analogue input being sent to the MC, you are not able to display the battery life on a dashboard. The LM3914N also requires some calculations to set reference volutes and to determine which resistors to use depending on your voltage difference between “fully charge” and “depleted” status. Keep in mind that for all practical reasons you should work with 3.1V on the battery as depleted as most components will not work below 3V or start behaving sporadically. Six of the one I suppose.
I would also not make use of the tilt switch again to trigger the battery indicator as it is to sensitive and causes ‘flicker’. A simple tactile switch seems like a much better idea… just a though.
A Must:
The biggest learning curve here for me was the effect any metal or circuit will have and a RFID reader. I designed, built and tested the entire unit first connected to a constant PSU. Due to the compact design of the unit, the battery was installed in very close proximity to the RFID reader module. The consequence…. No scans 😲 As a temporary measure I wrapped the battery in electrical insulation tape which did an “ok” job. I ordered some Ferrite from Amazon as a Hail Mary and like magic the interference was a thing of the past.
Thank you to everyone that assisted with the project in some way, @ScruffR for understanding we all had to start somewhere and showing extreme patience 🙂 Also a huge thank you to @Joe at Particle for the awesome Maker Kits. Looking forward to more projects!!!
Files:
Eagle Schematic - DOWNLOAD
Eagle Board File - DOWNLOAD
Awesome, right? Now, as promised... Here you’ll find some of the questions that Friedl kindly answered.
Q/ What made you start in the IoT ecosystem?
A/ I have always been fond of technology and my desire to create new things fit perfectly into the IoT sector. Developing new things that can improve life is what I like most.
Q/ Why you tried many platforms?
A/ As I am completely new to IoT and not particularly fond of coding, I was looking for and easy to use platform that is also cost efficient as opposed to writing my own. I found most platforms was designed with experience users kept in mind, this makes it very difficult for someone new to IoT. Even some experienced user might find spending too much time configuring unnecessarily complicated system. As my focus is mainly and developing products, product and PCB design, it was imperative that I find a solution I could quickly understand and start using.
Q/ What did you learn from each of them?
A/ Most platforms seems daunting to learn and very expensive if you are not careful. Low upfront costs or “free” versions can easily lure you into using the product, but as soon as you start streaming live data, it will prove to be quite expensive.
Q/ Why did you decide to go with Ubidots?
A/ Ubidots proved to be the best of both, easy to learn, quite inexpensive and fair data use policy. In addition to this, the support was great! The GUI is easy enough to understand and the custom label option is interesting, al be it, a bit pricey.
I really hope that this story inspires you to start building and tinkering on your own IoT different kind of projects, and better yet, we hope you use Ubidots to leverage your best efforts to enable your process.