DIY IoT project: Build a low-cost Smart Planter
A few weeks ago I decided to buy a succulent for my office desk only because of the benefits they can bring to the environment. In case you don't know, growing succulents or cactuses can benefit you in multiple ways, they help to purify the air, improve humidity of the spaces, and add fresh oxygen to the environment
After a few days of having Lana (Yes, I named it Lana 💕) on my desk, I started feeling that something was missing. As a passionate maker and an IoT Developer Advocate at Ubidots, I decided to create a "Smart Planter" for Lana using our tools. After a few days of hard work and many issues printing, finally, I ended up with this cool result, and I was eager to share with you my process 🙆♀️💚.
This project was inspired by a previous one created by Paul a Maker 👨💻 (3D Printing, Electronics, Software) that I have been following months ago, and I can say I have learned many tips and tricks from him. If you're looking for inspiration for your electronics projects, you should follow him, trust me.
Personally, I really like to find my own inspiration by following projects from someone else, anyway, I’ll always find a way to add my own style, give credits, and of course, sharing the end result for other people like me to get inspired as well. 🤓 🤓
This post contains a step-by-step for my project, as well as all the resources needed to replicate the "Smart Planter".
Requirements
- A succulent or cactus
- NodeMCU ESP8266
- DHT11 Temperature/Humidity sensor
- Soil moisture sensor
- RGB Ring
- (5) White LEDs
- 220 Ω Resistor
- Wires
- Breadboard PCB
- Right-angle male headers
- 3D Printer
- Soldering irons
- Solder Wire
Step-by-Step
- 3D Printing
- Wiring
- Casing
- Programming NodeMCU ESP8266
- Dashboard - Control & Monitor
- Summary
1. 3D Printing
My skills for modeling 3D pieces are kind of limited (I'm working on this to create more projects using the 3D printer), but there is an open community called Thingiverse that makes our life easier. It's a thriving design community for discovering, making, and sharing 3D printable things. After looking at many planters designs, I decided to print the following one:
Click here to downlink the design - thing:2857938
I really liked this design because it was already an IoT planter, and the lamp was a beautiful and cool accessory. Basically, this model was the perfect fit for what I had in mind since the beginning:
- Lamp for remote control.
- Space to place electronics components to add a few sensors.
However, I knew that the space for the electronics wasn't enough for all the functionalities I wanted to include. To solve this, I printed 2 times the bottom piece:
- White piece: To place the NodeMCU ESP8266, sensors, and wires.
- Transparent piece: To place the NeoPixel ring.
Having as a result a great-looking masterpiece.
NOTE: The NeoPixel ring is not mandatory for this project, it was just an accessory that made it prettier. You can also use only one piece.
2. Wiring
According to the firmware provided in this guide, establish a proper connection between the components used.
3. Casing
With the proper wire connections already established, place all the components inside the planter.
As you can notice, I placed the NodeMCU in a PCB Breadboard with 10 right angle headers. The idea was to establish the connection with the sensors and saving some space for the electronics. To be honest, I could have done a better job organizing the cables. However, the idea was to create a customized PCB for the planter, at a point, everything would be embedded. Also, I drilled the white piece to cross the NeoPixel ring cables through it. To finish, I glued the NeoPixel ring pointing down in the bottom, then, I glued the transparent piece to the white one in order to blur the light. At the end I had this awesome result.
4. Programming NodeMCU ESP8266
1. To be able to work with the ESP8266 platform in the Arduino IDE, you’ll need to install the ESP8266 platform using the preconfigured Arduino Board Manager. If you’re not familiar with adding a board with the Arduino IDE, refer to this article for additional guidance.
2. With the ESP8266 platform installed, select the ESP8266 device you are working with. In the case, we are working with a “NodeMCU 1.0”. To select your board from the Arduino IDE, select Tools > Board “Generic ESP8266 Module”.
3. Download and install the UbidotsMQTTESP8266 library. For a detailed explanation of how to install libraries using the Arduino IDE, refer to this guide.
4. Paste the code below into the Arduino IDE. Then, assign your unique Ubidots TOKEN, SSID (WiFi Name) and Password of the available network.
NOTE: Remember to assign the right pins for the components used in case you use a different connection than the one provided above
/*
RGB Smart Planter integrated with Ubidots for Monitoring & Control.

This code works for:

    1) Read two sensors: DHT11, and Soil Moisture.
    2) Publish sensors readings to Ubidots.
    3) Subscribe to multiple variables for remote control.

Libraries required:

- Ubidots ESP8266 MQTT - (https://github.com/ubidots/ubidots-mqtt-esp)
- Adafruit NeoPixel - (https://github.com/adafruit/Adafruit_NeoPixel)
- DHT - (https://github.com/adafruit/DHT-sensor-library)

Made by: Maria Hernández - IoT Developer Advocate @ Ubidots
Revision: José García - Development & Support Manager @ Ubidots

/****************************************
 * Include Libraries
 ****************************************/
#include <Adafruit_NeoPixel.h>
#include <stdio.h>
#include <map>
#include "DHT.h"
#include "UbidotsESPMQTT.h"

/****************************************
 * Define Pins
 ****************************************/
#define LIGHTPIN D1     // Digital pin for Led Lamp.
#define DHTPIN D5       // Digital pin for DHT sensor.
#define NEOPIXELSPIN D6 // Digital pin for NeoPixel Ring.
#define MOISTUREPIN A0  // Analog pin for Moisture Sensor.

/****************************************
 * Define Constants
 ****************************************/
#define TOKEN "BBFF-xxxxxxxxxx" // Assign your Ubidots TOKEN.
#define WIFINAME "xxxxxxxxxx"   // Assign your SSID.
#define WIFIPASS "xxxxxxxxxx"   // Assign your WiFi Password.
#define DEVICE "planter"        // Ubidots Device Label.
#define VAR_PUB_1 "temperature" // Ubidots Variables' label for publishing data.
#define VAR_PUB_2 "humidity"
#define VAR_PUB_3 "soil-moisture"
#define VAR_PUB_4 "heat-index"
#define VAR_SUB_1 "light-1" // Ubidots Variables' label for subscribing to data; \
                            // These variables have to be created at Ubidots.
#define VAR_SUB_2 "light-2"
#define NUMPIXELS 12 // 12 bit NeoPixel Ring
// Uncomment whatever type you're using
#define DHTTYPE DHT11 // DHT 11
//#define DHTTYPE DHT22   // DHT 22  (AM2302), AM2321
//#define DHTTYPE DHT21   // DHT 21 (AM2301)

typedef enum
{
  red,
  green,
  blue,
  yellow,
  white,
  black
} NeoPixelColor;

//   R,   G,   B
uint8_t myColors[][6] = {{250, 0, 0},                             // Red.
                         {0, 255, 0},                             // Green.
                         {0, 0, 255},                             // Blue.
                         {255, 255, 0},                           // Yellow.
                         {255, 255, 255},                         // White.
                         {0, 0, 0}};                              // Black.
const uint8_t numberOfVariables = 2;                              // Number of variables for subscription.
char *variableLabels[numberOfVariables] = {VAR_SUB_1, VAR_SUB_2}; // Variables' label for subscription.
float value;                                                      // Store incoming value.
int lastValue;
bool bottomLight;                         // flag to control conditions for the bottom light.
unsigned long initTime;                   // Store the init time.
const long SECONDS_TO_RECONNECT = 180000; // Period to reconnect MQTT connection.

// Comparison functor to map functions.
struct cmp_str
{
  bool operator()(char const *a, char const *b) const
  {
    return strcmp(a, b) < 0;
  }
};

// Map function declaration.
typedef std::function<void()> FunctionType;
typedef std::map<const char *, FunctionType, cmp_str> mapTopicSubscription;

/****************************************
 * Define Instances
 ****************************************/
Ubidots client(TOKEN);
Adafruit_NeoPixel pixels(NUMPIXELS, NEOPIXELSPIN, NEO_GRB + NEO_KHZ800);
DHT dht(DHTPIN, DHTTYPE);
mapTopicSubscription ubiSubTopic;

/****************************************
 * Main Functions
 ****************************************/
void setup()
{
  initTime = millis(); // Save the init time
  Serial.begin(115200);
  pinMode(LIGHTPIN, OUTPUT); // Declare pin mode
  // Defines the mapped functions to handle the subscription event.
  ubiSubTopic[VAR_SUB_1] = &subscriptionHandler1;
  ubiSubTopic[VAR_SUB_2] = &subscriptionHandler2;
  client.ubidotsSetBroker("industrial.api.ubidots.com"); // Sets the broker properly for the
                                                         // business account.
  client.setDebug(true);                                 // Pass a true or false bool value to activate debug messages.
  client.wifiConnection(WIFINAME, WIFIPASS);             // Establish WiFi connection.
  client.begin(callback);
  dht.begin();    // Initializes DHT sensor.
  pixels.begin(); // Initializes NeoPixel Ring.
  pixels.clear(); // Set all pixel colors to 'off'.
  // Establishes subscription with variables defined.
  client.ubidotsSubscribe(DEVICE, VAR_SUB_1);
  client.ubidotsSubscribe(DEVICE, VAR_SUB_2);
}

void loop()
{
  // Re-establishes subscription with variables defined when connection is lost or every 3 minutes.
  if (!client.connected() || abs(millis() - initTime) > SECONDS_TO_RECONNECT)
  {
    initTime = millis();
    client.reconnect();
    client.ubidotsSubscribe(DEVICE, VAR_SUB_1);
    client.ubidotsSubscribe(DEVICE, VAR_SUB_2);
  }

  client.reconnect();

  // Reading temperature, humidity and soil moisture values.a
  float humidity = dht.readHumidity();
  float temperature = dht.readTemperature();
  int soilMoisture = analogRead(MOISTUREPIN);
  // Compute heat index in Celsius (isFahreheit = false).
  float heatIndexC = dht.computeHeatIndex(temperature, humidity, false);

  // Check if any reads failed and exit early (to try again).
  if (isnan(humidity) || isnan(temperature))
  {
    Serial.println(F("Failed to read from DHT sensor!"));
  }

  // Controls NeoPixel's colors based on the temperature values.
  if (bottomLight)
  {
    if (inRange(temperature, 0, 16))
      colorWipe(blue, 50);
    if (inRange(temperature, 16, 21))
      colorWipe(green, 50);
    if (inRange(temperature, 21, 26))
      colorWipe(yellow, 50);
    if (inRange(temperature, 26, 40))
      colorWipe(red, 50);
  }

  // Adds variables to be published to Ubidots.
  client.add(VAR_PUB_1, temperature);
  client.add(VAR_PUB_2, humidity);
  client.add(VAR_PUB_3, soilMoisture);
  client.add(VAR_PUB_4, heatIndexC);

  // Publishes all variables added into the device defined.
  client.ubidotsPublish(DEVICE);
  client.loop();

  delay(1000);
}

/****************************************
 * Subscription Functions
 ****************************************/

// Function to be executed when var_sub_1 change its status.
void subscriptionHandler1()
{
  if (value == 1)
  {
    Serial.println("Planter Lamp turned ON.");
    digitalWrite(LIGHTPIN, HIGH);
  }
  else
  {
    Serial.println("Planter Lamp turned OFF.");
    digitalWrite(LIGHTPIN, LOW);
  }
};

// Function to be executed when var_sub_2 change its status.
void subscriptionHandler2()
{
  if (value != lastValue)
  {
    if (value == 1)
    {
      Serial.println("Planter bottom light turned ON.");
      for (int i = 0; i < 3; i++)
      {
        colorWipe(red, 50);
        colorWipe(green, 50);
        colorWipe(blue, 50);
      };
      colorWipe(white, 200);
      bottomLight = true;
    }
    else
    {
      Serial.println("Planter bottom light turned OFF.");
      colorWipe(white, 50);
      colorWipe(black, 200);
      bottomLight = false;
    }
  }
  lastValue = value;
};

/****************************************
 * Auxiliar Functions
 ****************************************/
// Return an int with the length of a char
int strLen(char *s)
{
  int l = 0;
  while (*s != '\0')
  {
    s++;
    l++;
  }
  return (l);
}

// Callback to handle subscription
void callback(char *topic, byte *payload, unsigned int length)
{
  char *variableLabel = (char *)malloc(sizeof(char) * 30);
  getVariableLabelTopic(topic, variableLabel); // Saves the variable label.
  value = btof(payload, length);               // Saves the value of the variable subscribed.
  executeCases(variableLabel);                 // Executes the function handler for the
                                               // variable subscribed.
  free(variableLabel);                         // Free memory.
}

// Parse the topic received to extract the variable label.
void getVariableLabelTopic(char *topic, char *variableLabel)
{
  sprintf(variableLabel, "");
  for (int i = 0; i < numberOfVariables; i++)
  {
    char *resultLv = strstr(topic, variableLabels[i]);
    if (resultLv != NULL)
    {
      uint8_t len = strlen(resultLv);
      char result[100];
      uint8_t i = 0;
      for (i = 0; i < len - 3; i++)
      {
        result[i] = resultLv[i];
      }
      result[i] = '\0';
      snprintf(variableLabel, strLen(result) + 1, "%s", result);
      break;
    }
  }
}

// Cast from an array of chars to float value.
float btof(byte *payload, unsigned int length)
{
  char *demo_ = (char *)malloc(sizeof(char) * 10);
  for (int i = 0; i < length; i++)
  {
    demo_[i] = payload[i];
  }
  return atof(demo_);
}

// Executes the respective "Subscription Function" based on the value received.
void executeCases(char *variableLabel)
{
  if (ubiSubTopic.find(variableLabel) != ubiSubTopic.end())
  {
    mapTopicSubscription::iterator i = ubiSubTopic.find(variableLabel);
    (i->second)();
  }
}

// Fills NeoPixel ring pixels one after another with color.
void colorWipe(NeoPixelColor color, int wait)
{
  int r, g, b;

  r = myColors[color][0];
  g = myColors[color][1];
  b = myColors[color][2];

  for (int i = 0; i < pixels.numPixels(); i++)
  {
    pixels.setPixelColor(i, r, g, b);
    pixels.show();
    delay(wait);
  }
}

// Verifies if the value received is in the expected range
bool inRange(float x, int low, int high)
{
  return ((x - low) > 0 && (high - x) >= 0);
}
5. Verify your code within the Arduino IDE. To do this, in the top left corner of our Arduino IDE you will see the "Check Mark" icon; select it to verify your code.
6. Upload the code into your “NodeMCU 1.0”. To do this, choose the "right-arrow" icon beside the "check mark" icon.
7. To verify the connectivity of the device and the data sent, open the serial monitor by selecting the "magnifying glass" icon in the top right corner of the Arduino IDE to see the connectivity logs as well as the responses from Ubidots server.
8. After a few seconds of initialization, the code provided will create a new device automatically into your Ubidots account. Go to the device section of your Ubidots account; you should see new devices automatically created.
Enter the device “Planter” and see the variables configured transmitting the data.
9. Then, create two new raw variables to establish the subscription and control the lights remotely. To do this, click "Add Variable > Raw Variable" and assign the variable label defined in the code. For the sample code provided, the variables labels to be created are "light-1" and "light-2".
With the variables successfully created, you're all set.
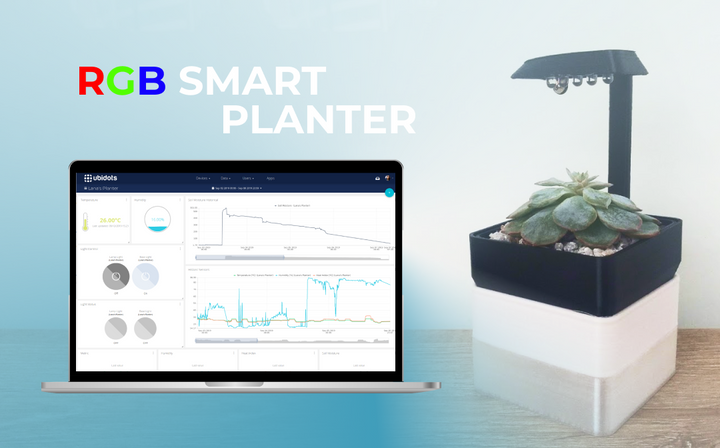
5. Dashboard - Control & Monitor
With everything already integrated, it’s time to present the devices' data in a Dashboard. Also, the dashboard will also serve to control the status of both lamps.
1. To create your first dashboard, go to the Dashboard tab (Data → Dashboards). Then, select the plus (+) icon in the top-right , then select the desired widget type. You should be able to create your own dashboards.
More about Ubidots Dashboards: Application Branding: Custom styles for your dashboards and widgets
Ubidots is very intuitive for any user to administer their data, allowing anyone to customize it as much as they want; in case you would like to know more, I really recommend checking out the following guides:
- Ubidots Basics: Devices, Variables, Dashboards, and Alerts
- Ubidots Basics: Applications, Organizations, and Users Explained
2. Ubidots support already integrated events to allow you to send Events, Alerts, and Notifications based on your sensors and actuators data.
Check out the type of events supported and learn how to set up each of them:

- Email notifications
- SMS notifications
- Webhook events - learn more
- Telegram notifications
- Slack notifications - learn more
- Voice Call notifications - learn more
- Back to Normal notification - learn more
- Geofence notifications - learn more
6. Summary
After a couple of hours of making and coding,(and a lot of coffees), I gave life to this Smart Planter:
As I mentioned in the beginning, I made this because I didn’t only want a new desk decoration, but also, I felt that something was missing for Lana, I wanted to invent my own way of communicating with her through IoT and data. In case you want other ways to communicate with your plants you can listen to them using the MIDI Sprout. This is cool, right? 🤩
This is just the V0 of the Smart Planter and there are a few things I want to improve,such as the design, electronics organization with a custom PCB, and integrating with other services such as Google Assistance, Alexa, and Twitter.
I hope you enjoyed this as I did. In case you have any comments or questions about the project, feel free to reach-out! I'm totally open to constructive feedback to enhance this type of projects and share them with you. 😁💚
More useful IoT projects:
