Hi, im trying to figure out a way to make users edit a text box, in order to put information about the product, (so other users with access to that widget can see the info (there’s no problem if anyone can edit it).
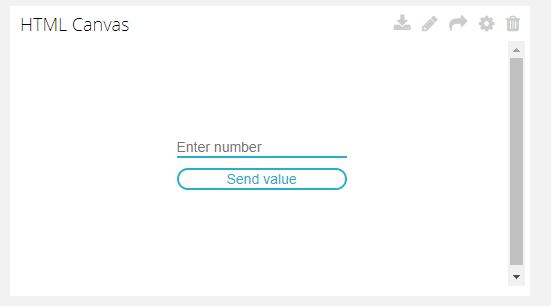
What im thinking of (probably not the best idea) is to create a device that will be just a local device so i wont connect it to any hardware, inside that device create a variable in which i will store that info, then use the HTML canvas to create an input box and send that to the variable and then display it with a metric.
Greetings, the example works properly and has been tested several times in the past for many users, please make sure that you are filling properly with your TOKEN and VARIABLE_ID the JS code and that you are adding the third party JQuery library: https://ajax.googleapis.com/ajax/libs/jquery/3.2.1/jquery.min.js
Please keep in mind that the HTML canvas is intended for developers with JS Knowledge, if you have not developed using it you can also simulate data without hardware as suggested in this article.
When using your example HTML canvass widget to enter a numerical value into a variable, does the “JS Library URI” field need to contain something?
I’m using your example as is, entered my token and variable ID in the JS section, connected it to the correct variable, but the widget does not update the variable. So I’m wondering if the “JS Library URI” field can remain empty if I use your example, or do I need to put something in there?
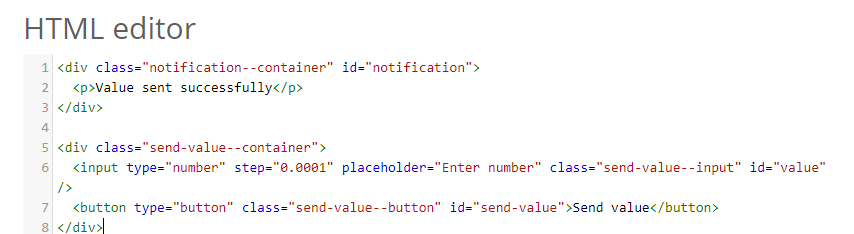
Next question - in order to use this widget to send a short text message instead of numbers, could you tell me what I need to change to the code? In the HTML section I changed the input type to text : <input type=“text”, but the widget still only accepts numbers.
please keep in mind that the HTML is intended for users with HTML and JS knowledge, if you are not familiarized with these concepts we strongly advise you to learn their basics before of trying to use it. Now, about your question, the input type of the text box in the HTML code is set as ‘number’, you should change the type if you wish to input text.
If you read my previous post you will noticed that what you suggested, I already did. But the input does not accept text, only numbers. Could you humour me by telling me what else needs to be changed?
I did not modify nothing in the JS code, btw, the code from the example will not work for you if you intend to send data to Ubidots because of the reasons below:
The code is intended to send values, that is why this line value: parseInt($value.val(), 10)is presented, the JS parseInt() is intended to parse a string with only numbers value as a base10 number.
Tha value for a variable must be numerical, strings or char arrays are not allowed.
If you plan to send strings, you will have to use the variable’s context to store them. In these articles you can find some examples of how to use the variable’s context:
This widget “Simple text box to set to variable” does not work either, I copy and paste the codes as they are in https://help.ubidots.com/developer-guides/html-canvas-widget-examples, but when changing the value and using the Ubidots Arduino Ethernet library does not change the value of the variable, while using the “Slider” control Widget does change the value of the variable.
Libraries included / #include <Ethernet.h> #include <SPI.h> #include <UbidotsEthernet.h>
/*
Constants and objects
******************************/
/ Assigns the Ubidots parameters /
char const * TOKEN = “hKGMQQufatu9xIKhKFKjcTWlOFc8UH”; // Assign your Ubidots TOKEN
char const * DEVICE_LABEL = “arduino-ethernet”; // Assign the unique device label
char const * VARIABLE_LABEL = “latitud”; // Assign the unique variable label to get the last value
/ Enter a MAC address for your controller below /
/ Newer Ethernet shields have a MAC address printed on a sticker on the shield */
byte mac[] = { 0xDE, 0xAD, 0xBE, 0xEF, 0xFE, 0xED };
/* initialize the instance */
Ubidots client(TOKEN);
/********************************
Main Functions
******************************/
void setup() {
Serial.begin(9600); //client.setDebug(true);// uncomment this line to visualize the debug message
/ start the Ethernet connection /
Serial.print(F(“Starting ethernet…”));
if (!Ethernet.begin(mac)) {
Serial.println(F(“failed”));
} else {
Serial.println(Ethernet.localIP());
}
/ Give the Ethernet shield a second to initialize /
delay(2000);
Serial.println(F(“Ready”));
}
void loop() {
Ethernet.maintain();
/ Getting the last value from a variable /
float value = client.getValue(DEVICE_LABEL, VARIABLE_LABEL);
/ Print the value obtained */
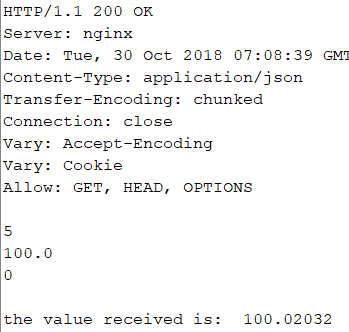
Serial.print("the value received is: ");
Serial.println(value,5);
delay(5000);
}
Greetings, the example from the help center works properly, you can find a live example here.
Please make sure that you are following all the steps from the tutorial, if you are an educational user do not forget to change the endpoint from industrial.api.ubidots.com to things.ubidots.com