Is it possible to replace the name of the variable in a Slider widget with text?
I’m thinking of using a slider as a more compact state indicator than a bunch of indicators (which take up too much space).
Is it possible to replace the name of the variable in a Slider widget with text?
I’m thinking of using a slider as a more compact state indicator than a bunch of indicators (which take up too much space).
Hi there @wbp, actually it is not possible but I will add your feedback to our backlog queue in order to analyze it for future improvements.
All the best
Hello Will (@wbp),
Regrettably, as Jose just mentioned is not supported at the moment. However, Ubidots let you be creative and allow you to create your own widgets using the HTML Canvas Widget. If you have expertise programming in JavaScript this can be an option for your solution.
Here you can find a couple of guides to start tinkering with it.
Cheers,
Maria H.
Thanks, Maria,
I have absolutely no JavaScript experience. I had already taken a quick look at the HTML canvas thing but figured that was going to be a bit too much. What might help is if there were starting examples for a few of the existing widgets, so we could see how that’s done. There are several examples of more complicated stuff, but how about one for a simple indicator and another for a switch that we could then customize?
Will
I completely understand you. When we talk about interface design I also get a little lost, however I will look for some examples that can serve as a reference. I’ll share them with you as soon as I can. 
Cheers,
Maria
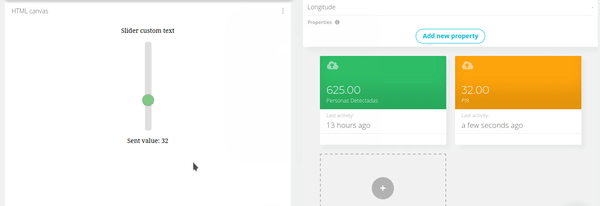
Hey Will (@wbp),
Here’s the example I promised you this morning. You must add each section of the code where it corresponds in the configuration of the canvas widget.
HTML:
<div class="slidecontainer">
    <p>Slider custom text</p>
    <div>
        <input type="range" min="1" max="100" value="50" class="slider" id="myRange">
    </div>
    <p id="sentValue"></p>
</div>
CCS:
.slidecontainer {
    text-align: center;
}

.slidecontainer div {
    align-items: center;
    display: flex;
    height:200px;
    justify-content: center;
}

.slider {
    background: #d3d3d3;
    border-radius: 5px;
    cursor: pointer; /* Cursor on hover */
    height: 15px;
    opacity: 0.7;
    outline: none;
    transform: rotate(270deg);
    transition: opacity .15s ease-in-out;
    width: 200px;
    -webkit-transition: opacity .15s ease-in-out;
    -webkit-appearance: none;
}

.slider::-webkit-slider-thumb {
    appearance: none;
    background: #4CAF50; /* Green background */
    border-radius: 25px;
    height: 25px; /* Slider handle height */
    width: 25px; /* Set a specific slider handle width */
    -webkit-appearance: none; /* Override default look */
}

.slider::-moz-range-thumb {
    background: #4CAF50; /* Green background */
    border-radius: 25px;
    height: 25px; /* Slider handle height */
    width: 25px; /* Set a specific slider handle width */
}
JavaScript:
var $value = $('#myRange');
var TOKEN = 'YOUR TOKEN';
var VARIABLE_ID = 'YOUR VARIABLE ID';

function postValue(variable, token, callback) {
    var url = 'https://industrial.api.ubidots.com/api/v1.6/variables/' + variable + '/values';
    var headers = {
        'Content-Type': 'application/json',
        'X-Auth-Token': TOKEN
    };

    $.ajax({
        data: JSON.stringify({
        value: parseFloat($value.val(), 10)
        }),
        method: 'POST',
        url: url,
        headers: headers,
        success: function (res) {
        callback(res.value);
        }
    });
}

$value.on('change', function () {
    postValue(VARIABLE_ID, TOKEN, function (value) {
        $('#sentValue').text('Sent value: ' + value.toString());
    });
});
3rd party libraries:
https://cdnjs.cloudflare.com/ajax/libs/jquery/3.3.1/jquery.min.js
Just as a reference I will share with you the complete HTML code that includes the styles and the javascript code, however this is not needed, it is only as a reference.
<!DOCTYPE html>
<html lang="en">
<head>
    <meta charset="UTF-8">
    <meta name="viewport" content="width=device-width, initial-scale=1.0">
    <meta http-equiv="X-UA-Compatible" content="ie=edge">
    <title>Document</title>
    <script src="https://cdnjs.cloudflare.com/ajax/libs/jquery/3.3.1/jquery.min.js"></script>
    <style>
        .slidecontainer {
            text-align: center;
        }

        .slidecontainer div {
            align-items: center;
            display: flex;
            height:200px;
            justify-content: center;
        }

        .slider {
            background: #d3d3d3;
            border-radius: 5px;
            cursor: pointer; /* Cursor on hover */
            height: 15px;
            opacity: 0.7;
            outline: none;
            transform: rotate(270deg);
            transition: opacity .15s ease-in-out;
            width: 200px;
            -webkit-transition: opacity .15s ease-in-out;
            -webkit-appearance: none;
        }

        .slider::-webkit-slider-thumb {
            appearance: none;
            background: #4CAF50; /* Green background */
            border-radius: 25px;
            height: 25px; /* Slider handle height */
            width: 25px; /* Set a specific slider handle width */
            -webkit-appearance: none; /* Override default look */
        }

        .slider::-moz-range-thumb {
            background: #4CAF50; /* Green background */
            border-radius: 25px;
            height: 25px; /* Slider handle height */
            width: 25px; /* Set a specific slider handle width */
        }
    </style>
</head>
<body>
    <div class="slidecontainer">
        <p>Slider custom text</p>
        <div>
            <input type="range" min="1" max="100" value="50" class="slider" id="myRange">
        </div>
        <p id="sentValue"></p>
    </div>
    <script>
        var $value = $('#myRange');
        var TOKEN = 'YOUR TOKEN';
        var VARIABLE_ID = 'YOUR VARIABLE ID';

        function postValue(variable, token, callback) {
            var url = 'https://industrial.api.ubidots.com/api/v1.6/variables/' + variable + '/values';
            var headers = {
                'Content-Type': 'application/json',
                'X-Auth-Token': TOKEN
            };

            $.ajax({
                data: JSON.stringify({
                value: parseFloat($value.val(), 10)
                }),
                method: 'POST',
                url: url,
                headers: headers,
                success: function (res) {
                callback(res.value);
                }
            });
        }

        $value.on('change', function () {
            postValue(VARIABLE_ID, TOKEN, function (value) {
                $('#sentValue').text('Sent value: ' + value.toString());
            });
        });
    </script>
</body>
</html>
I hope this helps! 
Cheers,
Maria H.
Thank you! How do I connect this to an existing variable? I tried setting the TOKEN and VARIABLE_ID values in the Javascript file but it doesn’t seem to be working… Is there something else I need to do?
Will
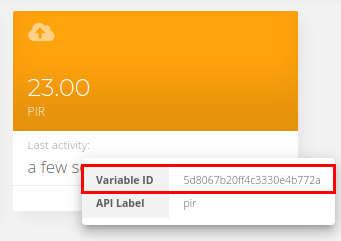
It’s working like a charm for me. Take a look:
Make sure to assign the variable ID marked below. Sometimes users get confused between variable ID and variable label.
Cheers,
Maria H.
it does set the value of the variable, as reflected in another slider set to the same variable. How do I get it to update when a new value is received from my application on the Arduino?
Thanks!
Will
As I mentioned earlier, the code provided is just a reference for you to make the settings according to your needs. To make the changes you must modify the JavaScript code.
If you want to update it when a value is received from the Arduino, you must associate the widget to a variable that will report that change of state, and from your Arduino schedule a request to that variable when the value is received.
Cheers,
Maria H.
I was not clear, sorry.
I have 2 sliders - one which was created from the “Slider” widget and one from the example you gave. My Arduino code sends new values to the variable that both of them are connected to. When this happens the Slider widget changes, but the new one does not. Unless I am missing something I am already doing what you suggest - associating the widget with a variable that is being updated by my program. The new widget created with the HTML Canvas does adjust the value of the variable, but changes made to the variable by my program are not being reflected.
Thanks,
Will
OK, very new to all this, but by turning on the web console and adding a few “console.log” statements to figure out what was happening, I managed to come up with something that works. It’s a tad slow, and I hope to figure out how to change it to use a callback, but for now it’s displaying new values shortly after they are received…
Here’s the JavaScript code I added to pick up the new value of the variable and set the slider’s value from it:
var lastValue = 0;
function getLastValue(variableId, token) {
var url = ‘https://industrial.api.ubidots.com/api/v1.6/variables/’ + variableId + ‘/values’;
$.get(url, { token: token, page_size: 1 }, function (res) {
var newValue = res.results[0].value;
console.log("getLastValue called… ", newValue);
if (lastValue === null || newValue !== lastValue) {
console.log("value changed: ", newValue);
lastValue = newValue;
$value.val(newValue);
$(‘#sentValue’).text('Rcvd value: ’ + newValue.toString()); }
});
}setInterval(function () {
getLastValue(VAR1, TOKEN);
}, 2000);
This also updates the text at the bottom of the slider with the received value.
I guess an old dog can learn something new…
Will
Hey Will,
I’m very happy to hear that you’re moving forward with the project.
After reviewing the code you provided, I can say that the extra time it takes to change to the state is because the setInterval function is responsible for executing the function every X milliseconds, in this case, the data is sent every 2 seconds. However, it is important to keep in mind that data will be sent every 2 seconds regardless if there is something in the input or not, so you have to perform extra validations (verify if the input has a data) to send valid data. Otherwise, some data can be rejected by Ubidots.
Cheers,
Maria H.
Yeah, I know there is a 2 second interval on the loop, that’s pretty obvious. What I am trying to figure out is how to do it the way the HTML Canvas examples work, which appears to be a callback mechanism - they do not use the setInterval() call. I would like my HTML Canvas slider to respond as quickly as the Slider widget, which I would guess does not use setInterval() either…
which reminds me, in these examples:
there are several “to see this example click here” buttons but none of them work - 404 errors. Does the code still work?
Thank you so much for the note. If you access again you will see the demo of the first three examples.
Regarding the last two examples, I suspect there is a problem with the libraries. Already inform the team to review them, I will be informing you once they are up and running again.
Cheers,
Maria H.